Category Archives: Manuals

avalon water dispenser manual

Avalon Water Dispenser Manual: A Comprehensive Guide

Avalon offers diverse water dispenser models, including bottom and top-loading options, with stainless steel and black finishes, holding up to 5 gallons.

Understanding Your Avalon Dispenser

Your Avalon water dispenser is designed for convenient access to purified water, offering hot, cold, and room temperature options; Whether you have a bottom-loading or top-loading model – like the A4BLWTRCLR – understanding its core functions ensures optimal performance.

Avalon prioritizes user satisfaction, offering a range of features and a commitment to quality. Locating your model number (found in the manual or on the unit itself) is crucial for accessing specific support and troubleshooting resources.

This manual provides a comprehensive overview, from initial setup and safety precautions to cleaning and warranty information. Remember to retain your purchase date and order number for potential warranty claims or customer support interactions.

Avalon Model Numbers and Identification

Identifying your specific Avalon model is the first step towards accessing tailored support and resources. Model numbers, such as A3 or those associated with Limited Edition or Self-Cleaning Water Coolers, are critical for accurate information.

You can locate your model number in two primary places: within your user manual, typically on the cover or specifications page, and directly on the back of the water cooler unit itself.

Avalon utilizes these numbers to categorize features, parts, and troubleshooting steps. When contacting customer support or searching for replacement parts, having this number readily available will expedite the process and ensure you receive the correct assistance for your particular dispenser.

Locating the Serial Number

The serial number is a unique identifier for your specific Avalon water dispenser, crucial for warranty claims and specific support inquiries. While the model number identifies the type of dispenser, the serial number pinpoints your individual unit.

Typically, the serial number is located on a sticker affixed to the back of the unit. It’s often near the model number, but may be in a separate location. Carefully inspect the rear panel for a label containing a string of alphanumeric characters – this is your serial number.

Keep this number safe alongside your purchase date and order number. Having all three pieces of information will streamline any potential service requests or warranty processes with Avalon.

Unpacking and Initial Setup

Upon receiving your Avalon water dispenser, carefully inspect the packaging for any signs of damage during transit. Once opened, verify that all components are present. Do NOT plug in the dispenser before completing the initial setup steps.

Remove all packing materials, both inside and outside the unit. Wipe down the exterior with a soft, damp cloth to remove any dust or residue. Before installing a water bottle, ensure the dispenser is placed on a stable, level surface.

Retain your model number and purchase date for warranty purposes. Refer to the appropriate section of this manual – bottom-loading or top-loading – for specific bottle installation instructions.

Safety Precautions

To ensure safe operation of your Avalon water dispenser, always follow these guidelines. Never immerse the unit in water or any other liquid. Avoid operating the dispenser with a damaged cord or plug; contact Avalon support for assistance.

Keep the dispenser out of reach of children. Hot water can cause severe burns – exercise extreme caution when dispensing hot water. Do not attempt to repair the unit yourself; unauthorized repairs may void the warranty.

Ensure the dispenser is properly grounded. Unplug the unit before cleaning or performing any maintenance. Use only potable water in the dispenser. Avoid placing heavy objects on top of the unit.

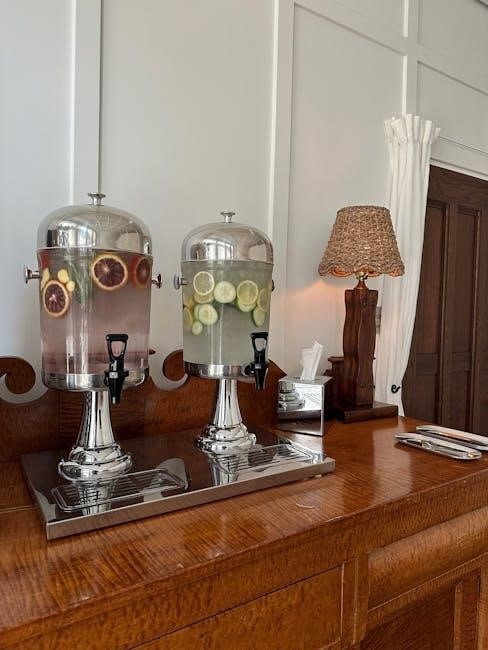
Components of the Avalon Water Dispenser

Your Avalon water dispenser comprises several key components for optimal functionality. These include the hot and cold water reservoirs, designed to maintain desired temperatures. The dispensing nozzles provide easy access to water, offering hot, cold, or room temperature options.

Depending on the model, you’ll find either a bottom loading system or a top loading system for water bottle installation. The unit also features a housing, typically constructed from stainless steel, and internal components regulating temperature and dispensing.

Additional features may include a safety lock for the hot water nozzle and indicator lights displaying power and heating status.

Hot Water Reservoir

The Avalon hot water reservoir is a crucial component, maintaining heated water for beverages and other uses. It’s designed with safety in mind, often incorporating a child safety lock on the hot water dispensing nozzle to prevent accidental burns. The reservoir’s capacity varies by model, but it consistently delivers hot water at a consistent temperature.

Regular cleaning and sanitization of the hot water reservoir are essential to prevent mineral buildup and maintain water quality. The reservoir utilizes an internal heating element, controlled by a thermostat, to efficiently heat the water. Always ensure the unit is unplugged before any maintenance is performed on this component.

Cold Water Reservoir

The Avalon cold water reservoir provides refreshingly chilled water on demand. Utilizing a compressor cooling system, it efficiently lowers the water temperature without the need for chemicals. The reservoir’s size differs depending on the model, impacting the volume of cold water available. Maintaining optimal cooling performance requires regular cleaning to prevent mineral deposits and bacterial growth.

Proper ventilation around the dispenser is crucial for the cold water reservoir’s efficient operation. Avoid blocking the vents, as this can hinder the cooling process. The reservoir is typically constructed from BPA-free plastic, ensuring water purity and safety. Consistent temperature is maintained via a thermostat control.

Dispensing Nozzles

Avalon water dispensers feature dispensing nozzles for hot, cold, and room temperature water. These nozzles are designed for easy operation, typically utilizing a lever or push-button mechanism. The nozzles are crafted from food-grade materials to ensure water purity and prevent leaching of harmful substances. Regular cleaning of the nozzles is essential to maintain hygiene and prevent clogging.

Dripping from the nozzles can occur due to mineral buildup or a loose connection. Inspect the nozzles for any debris and ensure they are securely attached. Some models include safety features, such as a child safety lock on the hot water nozzle, preventing accidental burns. Proper nozzle function is vital for a seamless dispensing experience.

Bottom Loading vs. Top Loading Models

Avalon offers both bottom loading and top loading water dispenser models, each with distinct advantages. Top-loading dispensers are generally more affordable and require simply placing a standard 5-gallon bottle on top. However, they necessitate lifting heavy bottles. Bottom-loading water coolers eliminate this lifting, using a probe inserted into the bottle housed in a cabinet.

Bottom-loading models often include a hidden cabinet for bottle storage, offering a cleaner aesthetic. They typically require a specific type of bottle with a large probe opening. Consider your physical capabilities and preference for convenience when choosing between these two styles. Both types deliver convenient access to purified water.

Installing a Water Bottle (Bottom Loading)

To install a water bottle in your Avalon bottom-loading dispenser, begin by ensuring the unit is unplugged. Open the bottom cabinet door and remove any existing empty bottle. Carefully insert a full 5-gallon water bottle, ensuring the probe aligns with the bottle’s opening. Securely attach the probe to the bottle, following the instructions in your specific model’s manual.

Close the cabinet door. Prime the system by dispensing hot and cold water several times until a steady stream flows. This removes air from the lines. It’s crucial to use bottles designed for bottom-loading dispensers, featuring the correct probe fitting. Refer to your model number for specific guidance.

Installing a Water Bottle (Top Loading)

For Avalon top-loading models, begin by removing the dispenser cap. Carefully lift and center a standard 5-gallon water bottle onto the dispenser spike. Ensure a tight seal is formed to prevent leaks. Gently push down on the bottle to secure it onto the spike; you should hear a click or feel resistance.

Allow a few minutes for the water to flow from the bottle into the reservoirs. Prime the system by dispensing water from each nozzle – hot, cold, and room temperature – until a consistent stream emerges. Always verify the model number’s instructions for specific bottle compatibility and sealing procedures.

Operating Instructions

Avalon water dispensers feature intuitive operation. To dispense water, simply press the corresponding paddle – labeled for hot, cold, or room temperature. For hot water, exercise caution as it reaches high temperatures. Ensure a cup is firmly positioned before dispensing to avoid spills.

Some models may include safety locks for the hot water function, preventing accidental activation. Regularly check water levels and bottle status. If the dispenser isn’t cooling, consult the troubleshooting section. Remember to always refer to your specific model number’s manual for detailed instructions and safety guidelines.

Dispensing Hot Water

Avalon dispensers provide convenient access to hot water for tea, coffee, or other beverages. Press the clearly marked “Hot” paddle to initiate dispensing. Be extremely cautious, as the water is heated to a high temperature and can cause burns. Always ensure a suitable container is securely placed beneath the nozzle before activating.

Certain models incorporate a safety lock feature for the hot water function; familiarize yourself with its operation. Never leave hot water unattended, especially around children. If the hot water isn’t reaching the expected temperature, consult the troubleshooting guide. Refer to your specific model number’s manual for detailed safety instructions.

Dispensing Cold Water

Enjoy refreshingly cold water with your Avalon dispenser by pressing the designated “Cold” paddle. Ensure a glass or container is positioned correctly under the cold water nozzle before activation to prevent spills. The cooling process may take some time initially, particularly after a bottle change or prolonged inactivity.

The dispenser’s cooling capacity is dependent on the ambient temperature and usage frequency. If the water isn’t sufficiently cold, check the power connection and cooling settings. Refer to your specific model’s manual for optimal performance guidelines. Regularly cleaning the dispenser contributes to maintaining optimal cooling efficiency. Remember your model number when contacting support.

Dispensing Room Temperature Water

For room temperature water, simply press the appropriately labeled paddle on your Avalon dispenser. This provides uncooled water directly from the bottle, ideal for various uses beyond drinking. As with other dispensing functions, ensure a suitable container is placed under the nozzle before pressing the paddle to avoid messes.

The availability of room temperature water is consistent regardless of the cooling system’s status. This feature is particularly useful if you prefer water without chilling or require water for tasks like preparing beverages or rinsing. Keep your model number handy for any inquiries regarding your specific water cooler’s operation.

Cleaning and Maintenance

Regular cleaning ensures your Avalon water dispenser delivers fresh, great-tasting water. Wipe down the exterior with a damp cloth and mild detergent. Avoid abrasive cleaners that could damage the finish. For internal cleaning and sanitization, it’s recommended to periodically flush the system with a sanitizing solution specifically designed for water dispensers.

Refer to your model number’s specific instructions for detailed sanitization procedures. Maintaining a clean dispenser prevents bacterial growth and ensures optimal performance. Remember to unplug the unit before any internal cleaning. Avalon prioritizes hygiene, and proper maintenance extends the life of your water cooler.

Exterior Cleaning

Maintaining a pristine exterior on your Avalon water dispenser is simple. Regularly wipe down all surfaces – including stainless steel and black finishes – with a soft, damp cloth. A mild dish soap solution can be used for more stubborn marks, but ensure thorough rinsing afterward to avoid residue.

Avoid abrasive cleaners, scouring pads, or harsh chemicals as these can scratch or discolor the surface. Pay attention to the dispensing nozzles, wiping them after each use to prevent mineral buildup. Consistent exterior cleaning not only enhances the appearance of your water cooler but also contributes to overall hygiene.

Internal Cleaning & Sanitization

Regular internal cleaning is crucial for maintaining water quality in your Avalon dispenser. While self-cleaning models exist, all units benefit from periodic sanitization. Disconnect the power and remove the water bottle before starting. Flush the system by dispensing several gallons of water.

A sanitizing solution – following manufacturer’s instructions – can be run through the system, then thoroughly flushed with fresh water. This eliminates potential bacteria and mineral buildup within the reservoirs and dispensing lines. Frequency depends on water source quality, but quarterly sanitization is recommended. Always consult your model number’s specific instructions.

Troubleshooting Common Issues

Encountering problems with your Avalon water dispenser? Several issues have straightforward solutions. If the dispenser isn’t cooling, ensure it’s plugged in and the cooling switch is activated. Water leaks often indicate a loose bottle connection or a damaged reservoir – check these first.

For more complex issues, referencing your specific model number in the manual is vital. Contacting Avalon support (salesavalonh2o.com) is recommended if problems persist. Remember to have your order number and purchase date available when seeking assistance. Proper maintenance minimizes these occurrences, ensuring consistent performance.

Dispenser Not Cooling

If your Avalon water dispenser isn’t cooling, begin with the simplest checks. Confirm the unit is securely plugged into a functioning power outlet. Verify the cooling switch, typically located on the back or inside the dispenser, is switched to the “on” position.

Ensure the ambient room temperature isn’t excessively high, as this can impact cooling efficiency. A buildup of scale inside the reservoirs can also hinder performance; regular cleaning is crucial. If these steps don’t resolve the issue, consult your model’s specific troubleshooting section in the manual or contact Avalon support.

Water Leaks

Discovering water leaks from your Avalon water dispenser requires immediate attention. First, inspect the water bottle connection (for both top and bottom-loading models) to ensure it’s securely fastened and the probe is properly inserted. Check the dispensing nozzles for any cracks or damage.

Examine the internal reservoirs and tubing for signs of cracks or loose connections. A common cause is improper bottle installation, leading to pressure imbalances. If the leak persists after these checks, discontinue use and contact Avalon support, providing your model number for assistance. Do not attempt complex repairs yourself.

Avalon Water Dispenser Warranty Information

Avalon stands behind the quality of its water dispensers with a comprehensive warranty. To initiate a claim, retain your original purchase date and model number. The standard warranty typically covers manufacturing defects in materials and workmanship for a specified period, often one year from the date of purchase.

This warranty doesn’t cover damage resulting from misuse, accidents, or unauthorized repairs. Avalon offers a replacement or refund if you’re not satisfied with your water dispenser. Contact salesavalonh2o.com for a free quote or to explore warranty options. Proof of purchase is essential for all warranty claims.

Contacting Avalon Support

For assistance with your Avalon water dispenser, or to explore frequently asked questions, reach out to their dedicated support team. Direct inquiries to salesavalonh2o.com to obtain a free quote or discuss specific product concerns. Avalon provides support for various models, including A3, Avalon Limited Edition, and Self-Cleaning Water Coolers.

When contacting support, have your model number readily available, as it’s crucial for efficient assistance. You can often find this information on the back of your unit or within the user manual. Avalon aims to provide prompt and helpful service to ensure customer satisfaction with their water dispenser products.

Product Dimensions and Specifications

Avalon water dispensers are designed with convenience and space efficiency in mind. Typical product dimensions are approximately 12 inches in depth (D), 13 inches in width (W), and 41 inches in height (H). These dimensions can vary slightly depending on the specific model.

The capacity of most Avalon units is 5 gallons, accommodating standard water bottle sizes. Materials commonly used include stainless steel for durability and a sleek aesthetic. Item numbers, like 256798895296, are used for tracking and ordering. Customer feedback indicates a 4.8 accuracy in product descriptions and a 4.8 rating for shipping speed.

Avalon Water Dispenser Return/Refund Policy

Avalon stands behind the quality of its water dispensers and offers a customer-centric return and refund policy. If you are not completely satisfied with your Avalon purchase, they will readily replace the unit or issue a full refund. This commitment ensures customer peace of mind and confidence in the product.

To initiate a return or refund, it’s helpful to have your model number and original purchase date readily available. Contact Avalon’s sales team via salesavalonh2o.com to begin the process and receive a free quote for any potential replacements or returns. This policy demonstrates Avalon’s dedication to customer satisfaction.

delonghi pinguino pac c120e manual

DeLonghi Pinguino PAC C120E Manual: A Comprehensive Guide

This guide provides detailed instructions for the DeLonghi Pinguino PAC C120E portable air conditioner, including setup, operation, maintenance, and troubleshooting – PDF versions available!

The DeLonghi Pinguino PAC C120E is a portable air conditioner designed to provide efficient cooling for medium-sized rooms, approximately up to 450 square feet. This comprehensive manual aims to guide users through every aspect of the unit, from initial setup and operation to regular maintenance.

Available as a 14-page PDF, the manual details the appliance’s features, safety precautions, and troubleshooting steps. Users can access both the manual and online support resources to maximize their experience with this convenient cooling solution. It’s a valuable resource for optimal performance.

Key Features and Specifications

The DeLonghi Pinguino PAC C120E boasts several key features, including three operating modes: Cool, Fan, and Dehumidify. Its specifications include a cooling capacity measured in BTU, and details regarding its power consumption. The unit utilizes a specific refrigerant type for efficient operation.

The manual provides a brochure and specs sheet, alongside instructions for use and a comprehensive user manual available as a free PDF download. These resources detail the unit’s dimensions and weight, ensuring informed user understanding.

Understanding the Control Panel

The DeLonghi Pinguino PAC C120E’s control panel allows users to manage power, select modes (Cool, Fan, Dehumidify), adjust temperature, and control fan speed settings.

Power Button and Indicator Lights

The power button on the DeLonghi Pinguino PAC C120E initiates operation and enters standby mode. Indicator lights clearly display the unit’s status, signaling when the unit is powered on, cooling, or if a tank requires emptying.

Different colored lights may indicate specific issues, such as a full water tank or a problem with the exhaust hose connection. Refer to the manual for a complete understanding of each light’s meaning. Properly interpreting these signals ensures optimal performance and prevents potential problems. Always check the lights before and during operation.

Mode Selection (Cool, Fan, Dehumidify)

The DeLonghi Pinguino PAC C120E offers three primary operating modes: Cool, Fan, and Dehumidify. Cool mode lowers the room temperature, utilizing refrigeration. Fan mode provides air circulation without cooling. Dehumidify mode extracts moisture from the air, reducing humidity levels.

Selecting the appropriate mode depends on your specific needs. Use Cool mode for temperature reduction, Fan mode for ventilation, and Dehumidify mode to combat dampness. The control panel allows easy switching between these modes for customized comfort.

Temperature Adjustment

The DeLonghi Pinguino PAC C120E allows precise temperature control within a specified range. Utilize the control panel’s “+” and “-” buttons to adjust the desired temperature. The display will show the set temperature. Lowering the temperature increases cooling intensity, while raising it reduces it.

Remember that the unit operates most efficiently when set to a reasonable temperature difference from the room temperature. Avoid excessively low settings for optimal energy consumption and performance. Experiment to find your comfort level!

Fan Speed Settings

The DeLonghi Pinguino PAC C120E offers multiple fan speed settings to customize airflow. Typically, these include low, medium, and high options, selectable via the control panel. Lower speeds provide gentle air circulation, ideal for quiet operation and energy saving. Higher speeds deliver maximum cooling power, quickly reducing room temperature.

An auto fan setting may also be available, automatically adjusting speed based on the set temperature. Experiment with different settings to find the balance between comfort and energy efficiency. Consider room size and personal preference.

Installation and Setup

Proper installation involves unboxing, attaching the exhaust hose, installing the window kit, and initial testing to ensure optimal performance of your DeLonghi unit.

Unboxing and Component Check

Carefully unpack your DeLonghi Pinguino PAC C120E and verify all components are present. You should find the air conditioner unit itself, the exhaust hose, the window kit, hose adapters, and this user manual. Inspect each item for any shipping damage.

Ensure the power cord is intact and the unit appears physically undamaged. Retain the original packaging for potential future transport or warranty claims. A complete component check before proceeding guarantees a smooth setup process and avoids potential issues later on.

Attaching the Exhaust Hose

Connect the exhaust hose to the rear of the DeLonghi Pinguino PAC C120E unit, ensuring a secure fit. Screw the hose adapter firmly onto both the air conditioner and the hose itself. Proper attachment is crucial for efficient operation and prevents warm air from re-entering the room.

Double-check the connection to avoid air leaks. The hose directs hot air outside, so a loose connection diminishes cooling performance. Refer to the diagrams in this manual for correct orientation and tightening procedures.

Window Kit Installation

Install the provided window kit into a suitable window opening to vent hot air outside. Adjust the kit’s panels to fit your window’s dimensions securely, minimizing gaps. Ensure a tight seal to prevent warm air from re-entering the cooled space.

Follow the manual’s diagrams for proper installation. The kit typically includes adjustable panels and sealing foam. Proper window kit installation is vital for optimal cooling efficiency and prevents energy waste. Securely fasten all components for stability.

Initial Power-Up and Testing

After setup, plug the DeLonghi Pinguino PAC C120E into a grounded electrical outlet. Press the power button to initiate operation. Verify the unit powers on and the indicator lights illuminate correctly, as described in the manual. Select your desired cooling mode and temperature setting.

Test the airflow by feeling for cool air emanating from the vent. Monitor the unit for any unusual noises or error codes. Ensure the exhaust hose is properly connected and venting outside for effective cooling performance.

Operating Instructions

Follow the DeLonghi Pinguino PAC C120E manual for detailed guidance on utilizing cooling, fan, and dehumidifying modes for optimal comfort and performance.

Cooling Mode Operation

To initiate cooling, ensure the exhaust hose is correctly installed and vented outside, as detailed in the DeLonghi Pinguino PAC C120E manual. Select “Cool” mode on the control panel. Use the temperature adjustment buttons to set your desired room temperature.

Fan speed can be adjusted for personalized comfort. The unit will automatically cycle on and off to maintain the set temperature. Regularly check the filter for optimal cooling performance, referencing the manual for cleaning procedures. Proper ventilation is crucial for efficient operation.

Fan Mode Operation

Selecting “Fan” mode on your DeLonghi Pinguino PAC C120E provides air circulation without cooling. This mode is ideal for simply moving air around a room, enhancing comfort without lowering the temperature. Utilize the control panel to choose from multiple fan speed settings – low, medium, or high – to customize airflow.

Unlike cooling mode, the compressor won’t activate in fan mode. Refer to the manual for specific button functions. Ensure the exhaust hose isn’t obstructed for optimal air movement.

Dehumidifying Mode Operation

The DeLonghi Pinguino PAC C120E’s dehumidifying mode extracts moisture from the air, reducing humidity levels without significantly cooling the room. This is beneficial in damp environments. Operation involves selecting the “Dehumidify” setting on the control panel. The unit will automatically manage fan speed to optimize moisture removal.

Water collected during dehumidification is stored internally; regularly check and empty the tank to prevent overflow. Consult the manual for drainage options and indicators.

Maintenance and Cleaning

Regular filter cleaning, exterior wiping, and proper storage are crucial for maintaining the DeLonghi Pinguino PAC C120E’s performance and longevity – see the manual!

Filter Cleaning Procedure

Maintaining a clean air filter is essential for optimal cooling and air quality with your DeLonghi Pinguino PAC C120E. The manual details how to access and remove the filter, typically located on the unit’s rear.

Regularly – ideally every two weeks during heavy use – vacuum the filter to remove dust and debris. For a more thorough clean, wash the filter with mild water, ensuring it’s completely dry before reinstalling.

A clogged filter reduces airflow and cooling efficiency, potentially causing the unit to work harder and consume more energy. Refer to the manual for specific filter cleaning guidance.

Exterior Cleaning

To maintain the appearance and hygiene of your DeLonghi Pinguino PAC C120E, regular exterior cleaning is recommended. Always disconnect the unit from the power source before cleaning.

Use a soft, damp cloth to wipe down the cabinet and control panel. Avoid abrasive cleaners or solvents, as these can damage the finish.

Ensure no water enters the unit’s internal components during cleaning. A clean exterior contributes to the longevity and overall performance of your portable air conditioner, as detailed in the manual.

Storage Instructions

When storing your DeLonghi Pinguino PAC C120E for extended periods, proper preparation is crucial. First, drain all remaining water from the unit to prevent mold and odors, as outlined in the manual.

Clean the filter thoroughly and allow it to dry completely before re-installing or storing it with the unit. Ensure the appliance is completely dry before storing it in a cool, dry place.

Protect the unit from dust and excessive humidity during storage, ideally covering it with a plastic bag. This preserves its functionality for future use.

Troubleshooting Common Issues

This section details solutions for typical DeLonghi Pinguino PAC C120E problems, including power failures, cooling issues, drainage, and error code explanations.

Unit Not Powering On

If your DeLonghi Pinguino PAC C120E fails to power on, first verify the power cord is securely plugged into a functioning electrical outlet. Check the outlet itself with another device to confirm it’s delivering power.

Examine the power cord for any visible damage, such as cuts or fraying. If damage is present, do not use the unit and consult a qualified technician. Ensure the unit’s power button has been firmly pressed.

Some models feature a reset button; consult the full manual for its location and usage. Finally, check your home’s circuit breaker or fuse box to ensure the circuit hasn’t tripped.

Insufficient Cooling Performance

If your DeLonghi Pinguino PAC C120E isn’t cooling effectively, ensure the exhaust hose is correctly connected and properly sealed to the window kit. Any leaks will drastically reduce cooling efficiency. Verify the air filter is clean; a clogged filter restricts airflow.

Confirm all doors and windows in the room are closed to prevent warm air from entering. Check the thermostat setting and ensure it’s set to a sufficiently low temperature. Avoid placing the unit in direct sunlight or near heat sources.

Water Drainage Problems

The DeLonghi Pinguino PAC C120E generates condensation during dehumidifying and cooling modes. If water isn’t draining correctly, check the drain hose for kinks or blockages. Ensure the hose is positioned lower than the unit’s drain outlet to allow gravity to assist drainage.

Regularly empty the water tank if continuous drainage isn’t utilized; Inspect the tank for any obstructions. Avoid tilting the unit excessively while water is present to prevent spillage and potential damage.

Error Codes and Their Meanings

The DeLonghi Pinguino PAC C120E utilizes error codes to signal malfunctions. While specific codes aren’t widely detailed in readily available resources, a general “E” code indicates an issue. Consult the full PDF manual for a comprehensive list.

Common problems include sensor errors or issues with the compressor. If an error persists, disconnect the unit, and contact DeLonghi support. Attempting self-repair without proper knowledge could void the warranty and cause further damage.

Safety Precautions

Always follow electrical safety guidelines and ensure proper ventilation when using the DeLonghi Pinguino PAC C120E to avoid unit damage or hazards.

Electrical Safety Guidelines

To ensure safe operation of your DeLonghi Pinguino PAC C120E, always connect the unit to a grounded electrical outlet with the correct voltage. Never use extension cords or adapters, as they can overheat and pose a fire risk. Regularly inspect the power cord for damage, and discontinue use if any issues are detected.

Avoid operating the unit with wet hands or in damp environments. Do not immerse the unit in water or any other liquid. Always unplug the unit before cleaning or performing any maintenance. If the power cord is damaged, it must be replaced by a qualified technician to prevent electrical shock.

Proper Ventilation Requirements

Effective operation of the DeLonghi Pinguino PAC C120E necessitates proper ventilation. The exhaust hose must be vented to the outside via the provided window kit, preventing recirculation of hot air. Ensure the exhaust hose isn’t kinked or blocked, maintaining efficient heat expulsion.

Avoid placing the unit near curtains or other obstructions that could impede airflow. Adequate ventilation optimizes cooling performance and prevents the unit from overheating. Regularly check the window kit for a secure fit, minimizing warm air intake.

Avoiding Damage to the Unit

To preserve the lifespan of your DeLonghi Pinguino PAC C120E, avoid operating it in excessively humid or dusty environments. Never immerse the unit in water or expose it to direct rainfall. Ensure the power cord isn’t damaged and avoid using extension cords if possible.

Regularly clean the air filters to prevent dust buildup, which can strain the compressor. Do not attempt to disassemble or repair the unit yourself; contact qualified service personnel for assistance. Proper storage during off-season is crucial.

DeLonghi PAC C120E Manual Resources

Access the DeLonghi PAC C120E user manual as a PDF, find online support, and explore frequently asked questions for optimal usage!

Downloading the PDF Manual

Obtain the complete DeLonghi Pinguino PAC C120E user manual in PDF format for offline access and convenient reference; Several websites host this document, offering a 14-page comprehensive guide.

Download options are readily available, typically ranging around 5.6MB in size. This PDF includes detailed instructions, specifications, and troubleshooting tips. Ensure your device has sufficient storage and a PDF reader installed before initiating the download.

Access the manual directly from DeLonghi’s support website or through various online manual archives for easy retrieval.

Accessing Online Support

DeLonghi provides extensive online support resources for the Pinguino PAC C120E. Visit the official DeLonghi website to find FAQs, troubleshooting guides, and contact information for customer service.

Explore online forums and communities dedicated to DeLonghi appliances where users share experiences and solutions. Many websites offer downloadable manuals and instructions.

Utilize DeLonghi’s virtual assistant or live chat features for immediate assistance with your specific questions or concerns regarding your portable air conditioner.

Frequently Asked Questions (FAQ)

Q: Where can I download the DeLonghi Pinguino PAC C120E manual? A: Numerous websites host the PDF manual, including DeLonghi’s official site and manual sharing platforms;

Q: What does an error code mean? A: Refer to the manual’s troubleshooting section for a comprehensive list of error codes and their corresponding solutions.

Q: How often should I clean the filter? A: Regular filter cleaning (as outlined in the manual) is crucial for optimal performance and air quality.

Technical Specifications in Detail

Detailed specs include cooling capacity in BTU, power consumption figures, and the specific type of refrigerant used within the DeLonghi unit.

Cooling Capacity (BTU)

The DeLonghi Pinguino PAC C120E boasts a cooling capacity of approximately 7,000 BTU (British Thermal Units). This rating signifies the amount of heat the unit can remove from a room per hour.

Effectively, this BTU level makes it suitable for cooling medium-sized rooms, generally around 160-250 square feet. However, optimal performance depends on factors like insulation, sunlight exposure, and room height.

Understanding the BTU rating is crucial for selecting an air conditioner that adequately meets your cooling needs, ensuring comfort and energy efficiency.

Power Consumption

The DeLonghi Pinguino PAC C120E typically consumes around 750-800 watts of power during normal operation in cooling mode. This consumption can vary depending on the selected fan speed and the set temperature.

Energy efficiency is a key consideration; utilizing the unit’s timer function and optimizing temperature settings can help minimize power usage.

Checking your local electricity rates will allow you to calculate the approximate running cost of the air conditioner, aiding in informed usage and budgeting.

Refrigerant Type

The DeLonghi Pinguino PAC C120E utilizes R410A refrigerant, a hydrofluorocarbon (HFC) commonly used in modern air conditioning systems; R410A is known for its higher efficiency compared to older refrigerants like R22.

It’s crucial to note that handling refrigerant requires specialized training and equipment; any maintenance involving the refrigerant circuit should only be performed by a qualified technician.

Proper disposal of the unit at the end of its life is essential to prevent refrigerant leakage and environmental impact, adhering to local regulations.

Warranty Information

DeLonghi offers a standard warranty for the PAC C120E, covering manufacturing defects. Review the specific terms and claim process details within the manual.

Coverage Details

DeLonghi’s warranty for the Pinguino PAC C120E typically covers defects in materials and workmanship under normal household use for a specified period, often one year from the purchase date. This coverage includes repair or replacement of defective parts, at DeLonghi’s discretion.

The warranty does not cover damage resulting from misuse, accidents, improper installation, or unauthorized repairs. It also excludes normal wear and tear, filters, and consequential damages. Proof of purchase is essential for any warranty claim. Refer to the full warranty document included with your unit or available online for complete details.

Claim Process

To initiate a warranty claim for your DeLonghi Pinguino PAC C120E, first gather your proof of purchase and a detailed description of the issue. Contact DeLonghi’s customer support via their website or phone number, found in the manual.

They will provide instructions, potentially requiring photos or videos of the defect. You may need to ship the unit to an authorized service center, with DeLonghi potentially covering shipping costs for covered defects. Keep all documentation related to your claim for tracking purposes.

2024 jetta sport manual vs automatic

The 2024 Volkswagen Jetta Sport presents a compelling choice for drivers: a spirited manual or a convenient automatic transmission. This comparison delves into both options,
considering performance and driver preference, to help you decide which suits your needs best.

Overview of the 2024 Jetta Sport

The 2024 Jetta Sport occupies a sweet spot within Volkswagen’s lineup, offering a blend of practicality, style, and engaging driving dynamics. Powered by a 1.5-liter turbocharged TSI engine, it delivers a robust 158 horsepower and 184 lb-ft of torque, providing ample power for daily commutes and spirited drives.

What sets the Sport apart is the availability of a six-speed manual transmission, catering to enthusiasts who crave a more connected driving experience. Alternatively, an eight-speed automatic transmission is offered for those prioritizing convenience and seamless gear changes. Both transmissions complement the Jetta Sport’s sporty character, and the model often features subtle visual enhancements compared to lower trims.

Orlando VW South highlights the engine’s consistent performance across both transmission options, while reviews suggest a slightly lower ride height on the Sport model, potentially due to wheel/tire combinations or spring differences, as noted on VW Vortex.

The Core Question: Manual or Automatic?

The choice between the manual and automatic transmission in the 2024 Jetta Sport fundamentally alters the driving experience. For purists, the six-speed manual offers a direct connection to the vehicle, granting precise control and heightened engagement. Reddit discussions, specifically on r/whatcarshouldIbuy, reveal a strong preference for the Jetta’s manual, praised for its excellent shift feel and overall driving enjoyment.

However, the eight-speed automatic provides a more relaxed and effortless experience, particularly in stop-and-go traffic. It caters to drivers who prioritize convenience without sacrificing performance. BubbaX emphasizes the automatic’s smooth, seamless shifts, effectively adapting to various driving styles. Ultimately, the “right” choice hinges on individual preferences and priorities.

Performance Comparison

Both 2024 Jetta Sport transmissions pair with the 1.5L turbocharged TSI engine, delivering 158 horsepower and 184 lb-ft of torque, impacting acceleration and responsiveness.

Engine Specifications: 1.5L Turbocharged TSI

The heart of both the 2024 Jetta Sport manual and automatic variants is Volkswagen’s refined 1.5-liter turbocharged TSI four-cylinder engine. This powerplant consistently delivers a robust 158 horsepower, providing ample power for daily commutes and spirited driving. More importantly, it generates a substantial 184 lb-ft of torque, offering strong acceleration and responsive performance across the rev range.

This engine is known for its efficiency and responsiveness, utilizing turbocharging technology to provide a balance between power and fuel economy. The TSI engine’s design contributes to a smooth and enjoyable driving experience, regardless of the chosen transmission. It’s a key component in the Jetta Sport’s appeal, offering a modern and capable powertrain for a variety of drivers.

Manual Transmission: Six-Speed Advantages

Opting for the 2024 Jetta Sport with the six-speed manual transmission unlocks a more engaging and connected driving experience. Enthusiasts appreciate the direct control over gear selection, allowing for precise acceleration and engine braking. The manual gearbox fosters a stronger connection between driver and machine, enhancing overall enjoyment.

Reddit discussions highlight the Jetta’s manual shifting quality as “so well,” contributing to an “awesome experience.” Beyond the feel, a manual transmission often provides slightly improved fuel efficiency and can be more reliable long-term due to its simpler mechanical design. It’s a compelling choice for drivers who prioritize control and involvement.

Automatic Transmission: Eight-Speed Smoothness

The 2024 Jetta Sport’s available eight-speed automatic transmission prioritizes convenience and effortless driving. This transmission delivers smooth, seamless shifts, enhancing comfort during daily commutes and long journeys. It’s an ideal choice for drivers who prefer a relaxed driving experience without sacrificing performance.

Orlando VW South notes the automatic effectively caters to different driving styles. While some may miss the engagement of a manual, the eight-speed automatic provides responsive acceleration and optimized gear selection for various driving conditions. It simplifies the driving process, allowing the driver to focus on the road ahead, and is a popular option for many buyers.

Acceleration and Responsiveness – Manual

The 2024 Jetta Sport, equipped with the six-speed manual transmission, offers a direct and engaging connection to the 1.5L turbocharged engine. Drivers experience crisp acceleration and precise control over gear selection, fostering a more involved driving experience. This setup allows for optimal power delivery, particularly when downshifting for quicker responses.

Reddit discussions highlight the Jetta manual’s enjoyable shift feel, with users recommending it for those prioritizing driving pleasure. The manual transmission empowers drivers to maximize the engine’s potential, resulting in a noticeably responsive and spirited performance. It’s a compelling choice for enthusiasts who value control and engagement.

Acceleration and Responsiveness – Automatic

The 2024 Jetta Sport’s eight-speed automatic transmission delivers smooth, seamless shifts, prioritizing comfort and ease of driving. While potentially sacrificing some of the direct engagement of the manual, the automatic provides consistently brisk acceleration, effectively utilizing the 1.5L TSI engine’s 158 horsepower and 184 lb-ft of torque.

Orlando VW South notes the automatic caters to different driving styles effectively. It intelligently selects gears for optimal performance in various situations, reducing driver fatigue during commutes or long journeys. The automatic transmission offers a refined and effortless driving experience, appealing to those who value convenience without compromising on responsiveness.

Driving Experience

The Jetta Sport offers distinct driving experiences depending on the transmission. The manual prioritizes driver engagement, while the automatic emphasizes ease of use and seamless shifts.

Manual Transmission: Driver Engagement

For enthusiasts, the 2024 Jetta Sport’s six-speed manual transmission delivers a deeply connected driving experience. Reddit discussions highlight the “awesome experience” of owning a Jetta with a manual, praising how well it shifts. This provides precise control, allowing drivers to fully engage with the vehicle and the road.

The manual gearbox empowers drivers to select the optimal gear for any situation, enhancing responsiveness and control. It’s a choice favored by those who enjoy a more involved and dynamic driving style. The tactile feedback and direct connection contribute to a sense of control often missing in automatic transmissions, making every drive more rewarding and enjoyable.

This transmission isn’t just about performance; it’s about the joy of driving.

Automatic Transmission: Ease of Use

The 2024 Jetta Sport’s available eight-speed automatic transmission prioritizes convenience and a relaxed driving experience. It offers smooth, seamless shifts, catering to drivers who prefer a less involved approach. This is particularly beneficial in stop-and-go traffic or during long commutes, reducing driver fatigue.

The automatic transmission allows drivers to focus on the road ahead without the need to constantly manage gear changes. It intelligently selects the appropriate gear for optimal performance and efficiency, providing a comfortable and effortless ride.

For those seeking simplicity and ease of use, the automatic transmission in the Jetta Sport is a compelling option, delivering a refined and stress-free driving experience.

Ride Quality – Sport Model Considerations

The 2024 Jetta Sport aims for a balance between sporty handling and everyday comfort. Discussions on VW Vortex suggest the Sport model may sit slightly lower to the ground compared to the base Jetta S, potentially enhancing its visual appeal and cornering stability. However, some owners note this difference might be subtle, possibly influenced by wheel and tire sizes.

Regardless of transmission choice – manual or automatic – the Sport model’s suspension is tuned to provide a more engaging driving experience. While offering a firmer ride than standard Jettas, it generally remains compliant enough for daily use.

The ride quality is a key consideration, balancing responsiveness with passenger comfort, making it suitable for both spirited drives and comfortable commutes.

Steering Feel – Manual vs. Automatic

The steering feel in the 2024 Jetta Sport exhibits subtle differences depending on the transmission. While both manual and automatic versions share the same steering system, the driver’s connection to the car feels more direct with the six-speed manual. This is largely due to the increased driver engagement and control offered by shifting gears yourself.

The automatic transmission, with its eight-speed configuration, provides smooth and seamless shifts, but can slightly distance the driver from the immediate road feel. However, the automatic still offers responsive steering, suitable for confident handling.

Ultimately, the preferred steering feel depends on individual driving style and preference for control versus convenience.

Features and Trim Levels

The 2024 Jetta Sport boasts standard features like a turbocharged engine and modern infotainment. Optional packages enhance comfort and technology, available with either transmission choice.

Jetta Sport Standard Features

The 2024 Jetta Sport arrives well-equipped, providing a solid foundation for an engaging driving experience regardless of transmission choice. At its heart lies a robust 1.5-liter turbocharged TSI four-cylinder engine, consistently delivering 158 horsepower and 184 lb-ft of torque. This engine is standard across both manual and automatic variants.

Inside, drivers will find a modern infotainment system, though specific details weren’t explicitly mentioned in the provided sources. Standard safety features are expected, aligning with Volkswagen’s commitment to driver and passenger protection. The Jetta Sport distinguishes itself visually with sporty styling cues, setting it apart from lower trim levels. Both transmission options benefit from these standard features, offering a compelling package for enthusiasts and daily commuters alike.

Optional Packages and Upgrades

While standard features are plentiful, the 2024 Jetta Sport allows for personalization through optional packages and upgrades. Discussions on VW Vortex hint at modifications like lowered ride heights, often achieved through aftermarket springs or wheel/tire combinations, enhancing the Sport’s already sporty stance.

Although specific package details weren’t detailed in the provided sources, potential upgrades likely include premium audio systems, advanced driver-assistance features, and interior enhancements. Owners seeking further customization may explore options like upgraded lighting or interior trim. The availability of these options doesn’t appear to differ based on whether the vehicle is equipped with a manual or automatic transmission, allowing all Jetta Sport buyers to tailor their car to their preferences.

Reliability and Maintenance

The 2024 Jetta, aiming for 200k+ miles, requires consistent upkeep; manual versions may have clutch replacements, while automatics need fluid services.

Long-Term Dependability (200k+ Miles)

Achieving 200,000+ miles with the 2024 Jetta Sport hinges on diligent maintenance, regardless of transmission choice. However, potential longevity differs slightly between the manual and automatic. Reddit discussions highlight the Jetta’s reputation for dependability, particularly the manual transmission, with owners praising their robustness.

The manual, while potentially requiring a clutch replacement during its lifespan, generally presents fewer catastrophic failure points compared to the automatic. Automatic transmissions, while convenient, can face more complex and costly repairs over the long haul. Consistent fluid changes are crucial for both, but especially vital for the automatic to prevent premature wear. Proactive maintenance, adhering to the Volkswagen schedule, is key to maximizing the Jetta Sport’s lifespan and ensuring it reaches – and surpasses – the 200k-mile mark.

Maintenance Schedules – Manual

Maintaining a 2024 Jetta Sport with a manual transmission requires a focused schedule. Every 10,000 miles (or annually, whichever comes first) necessitates oil changes, filter replacements (air, cabin, fuel), and a thorough inspection of all fluids. Crucially, the manual transmission fluid should be inspected and replaced every 30,000-40,000 miles, depending on driving conditions.

The clutch should be inspected for wear during routine service, with potential replacement anticipated around 60,000-100,000 miles, depending on driving habits. Regular checks of the shift linkage and cables are also essential. Following Volkswagen’s recommended maintenance intervals, detailed in the owner’s manual, is paramount for ensuring long-term reliability and preventing costly repairs.

Maintenance Schedules – Automatic

The 2024 Jetta Sport’s eight-speed automatic transmission demands a specific maintenance routine. Similar to the manual, oil changes and filter replacements are crucial every 10,000 miles or annually. However, the automatic transmission fluid (ATF) requires attention every 30,000-60,000 miles, depending on driving conditions – severe driving (towing, stop-and-go) necessitates more frequent changes.

Inspect the transmission for leaks and ensure smooth shifting during routine service. Volkswagen recommends a full transmission service, including fluid and filter replacement, at these intervals. Ignoring ATF maintenance can lead to premature wear and costly transmission failures. Adhering to the manufacturer’s recommended schedule, found in the owner’s manual, is vital for maximizing the lifespan and performance of the automatic transmission.

Cost Analysis

Choosing between the manual and automatic Jetta Sport impacts your wallet. The manual typically has a lower starting price, while fuel efficiency is comparable between both transmissions.

Price Difference: Manual vs. Automatic

When considering the 2024 Jetta Sport, the transmission choice directly influences the final price. Generally, opting for the six-speed manual transmission results in a lower initial investment compared to the eight-speed automatic. While specific pricing varies based on dealership and region, the automatic typically commands a premium.

This price difference reflects the added complexity and technology integrated into the automatic gearbox. Buyers prioritizing cost-effectiveness often lean towards the manual, appreciating the savings upfront. However, it’s crucial to factor in personal driving preferences and long-term ownership costs when evaluating this financial aspect. The price gap, while not substantial, can be allocated towards optional packages or accessories, enhancing the overall Jetta Sport experience.

Fuel Efficiency – Manual

The 2024 Jetta Sport equipped with the six-speed manual transmission generally exhibits slightly superior fuel economy compared to its automatic counterpart. This advantage stems from the direct mechanical connection between the engine and wheels, minimizing energy loss during power transfer. While official EPA estimates are crucial for precise figures, manual Jettas typically demonstrate a marginal increase in miles per gallon, both in city and highway driving conditions.

Drivers who prioritize maximizing fuel efficiency and enjoy a more engaged driving experience will find the manual transmission appealing. Skillful shifting and optimized gear selection can further enhance fuel economy. However, real-world fuel consumption is also influenced by individual driving habits and road conditions.

Fuel Efficiency – Automatic

The 2024 Jetta Sport featuring the eight-speed automatic transmission delivers commendable fuel efficiency, though typically slightly lower than the manual version. Modern automatic transmissions, like the one in the Jetta Sport, are designed to optimize gear selection for efficiency, minimizing engine strain and maximizing fuel economy. While a small amount of energy is lost through the torque converter, the automatic’s seamless shifting contributes to consistent performance.

For drivers prioritizing convenience and a relaxed driving experience, the automatic transmission remains an excellent choice. It provides comparable fuel economy to the manual, especially in stop-and-go traffic, and eliminates the need for constant gear changes.

Community Feedback & Considerations

Online forums, like Reddit and VW Vortex, reveal a strong preference for the Jetta’s manual transmission, praising its engaging shift feel and overall driving experience.

Reddit Discussions: Jetta Manual Preference

Reddit’s r/whatcarshouldIbuy forum showcases a clear leaning towards the 2024 VW Jetta manual transmission. Users seeking a dependable, long-term vehicle—aiming for 200,000+ miles—frequently recommend the Jetta, specifically highlighting the enjoyable and precise shifting experience.

One user explicitly stated a “10/10 would recommend a vw jetta manual,” emphasizing the rewarding feel of driving one. This sentiment reflects a broader frustration with the dwindling availability of manual options, particularly after Toyota discontinued manual Corollas. The Jetta, therefore, fills a niche for enthusiasts who prioritize driver engagement and control over automated convenience. The discussion underscores a desire for a connection to the driving experience that an automatic transmission simply cannot replicate.

VW Vortex Forum Insights: Ride Height & Mods

Discussions on VW Vortex, a dedicated Volkswagen forum, reveal observations regarding the 2024 Jetta Sport’s ride height. Several members noted a slightly lower stance on the Sport model compared to other Jetta trims, though attributing this difference proved complex. Initial speculation centered on wheel and tire size variations as a contributing factor, with some suggesting the visual difference might be minimal.

However, consensus emerged that the Sport model generally sits lower to the ground. One user recently acquired a 2024 Kings Red Metallic Sport with a six-speed manual transmission, joining a community actively exploring modifications and customizations. This indicates a strong enthusiast base willing to personalize their Jetta Sport, further highlighting the appeal of the manual option within this group.

Competitor Landscape

When considering alternatives, the Jetta GLI emerges as a close relative, while the Honda Civic Si and Subaru WRX present compelling options in the sporty compact segment.

Jetta GLI vs. Honda Civic Si & Subaru WRX

Stepping up from the Jetta Sport, the Jetta GLI offers a more potent engine and sport-tuned suspension, directly competing with the Honda Civic Si and Subaru WRX. The Civic Si, known for its precise handling and engaging manual transmission, provides a similar driver-focused experience. However, the WRX delivers all-wheel drive and a significantly more powerful engine, catering to those prioritizing performance and all-weather capability.

Compared to these rivals, the Jetta Sport strikes a balance between affordability and fun. While it may not match the outright power of the WRX or the refined handling of the Civic Si, it presents a compelling value proposition, especially for buyers seeking a manual transmission option – a feature becoming increasingly rare in this class. The GLI bridges the gap, offering more performance than the Sport but remaining more accessible than the WRX.

mitsubishi mini split manual pdf

Mitsubishi Mini Split Manual PDF: A Comprehensive Guide

Mitsubishi mini split manuals‚ often in PDF format‚ are crucial for installation‚ operation‚ and maintenance․ Understanding your model number unlocks specific details!

Understanding the Importance of Manuals

Mitsubishi Mini Split manuals are indispensable resources‚ offering a wealth of information vital for optimal system performance and longevity․ These guides detail everything from initial setup and daily operation to advanced troubleshooting and maintenance procedures․ Accessing the correct PDF manual empowers owners and technicians alike‚ ensuring safe and efficient use of the equipment․

Ignoring the manual can lead to improper installation‚ incorrect operation‚ and potentially costly repairs․ Manuals provide crucial safety guidelines‚ wiring diagrams‚ and error code explanations․ They also help decipher model and serial numbers‚ facilitating accurate parts ordering and service requests․ A comprehensive understanding of the manual translates to a well-maintained‚ reliable‚ and energy-efficient Mitsubishi Mini Split system․

Locating the Official Mitsubishi Mini Split Manual PDF

Finding the official Mitsubishi Mini Split manual PDF is often straightforward․ Begin your search on Mitsubishi’s official website; they typically host a comprehensive archive of manuals categorized by product type and model number․ Alternatively‚ utilize a targeted online search‚ including your specific model number in the query (e․g․‚ “MSZ-FS25VE manual PDF”)․

Beware of unofficial sources‚ as they may contain outdated or inaccurate information․ Always prioritize downloading from Mitsubishi’s website or authorized distributors․ Once located‚ ensure the PDF corresponds precisely to your unit’s model and serial number for accurate guidance․ Proper identification guarantees you have the correct instructions for your specific system․

Decoding Mitsubishi Model Numbers

Mitsubishi model numbers are a coded system revealing crucial information about your mini-split․ Knowing how to interpret these codes is invaluable for purchasing‚ troubleshooting‚ or understanding your unit’s specifications․ The initial characters often indicate the system type – indoor or outdoor unit‚ heat pump configuration‚ or specific component designation․ Subsequent digits define capacity and BTU ratings‚ essential for determining cooling and heating power․

Understanding this structure empowers you to quickly identify key features and specifications․ Referencing your manual alongside the model number unlocks detailed insights into your system’s capabilities and proper operation․

The First Characters: Identifying the System Type

The initial characters of a Mitsubishi model number are key to identifying the system type․ These prefixes distinguish between indoor and outdoor units‚ crucial for understanding system components․ For example‚ specific codes denote whether the unit is a heat pump‚ a standard air conditioner‚ or a dedicated component within a larger system․

Decoding these first characters allows for quick identification of the unit’s primary function․ Consulting your Mitsubishi mini split manual PDF‚ alongside the model number‚ will provide a definitive explanation of these prefixes and their corresponding system types․

Understanding Capacity and BTU Ratings

Mitsubishi mini split model numbers also reveal crucial information about cooling and heating capacity‚ typically expressed in British Thermal Units (BTUs)․ These ratings indicate the amount of heat the unit can remove (cooling) or add (heating) per hour․ Higher BTU ratings generally correspond to larger spaces or more demanding heating/cooling needs․

Determining the correct BTU rating is vital for optimal performance and energy efficiency․ Your Mitsubishi mini split manual PDF will detail how to interpret the BTU information within the model number‚ ensuring you select a system appropriately sized for your specific application․

Interpreting Mitsubishi Serial Numbers

Mitsubishi serial numbers‚ found on the unit’s data plate‚ offer insights into the manufacturing date and potentially‚ the unit’s history․ Decoding these numbers can be helpful when troubleshooting or seeking warranty information․ While formats vary‚ the first digit often indicates the last digit of the manufacturing year – a ‘6’ could signify 2006 or 2016․

Consulting your Mitsubishi mini split manual PDF‚ or referencing online resources‚ is crucial for accurately interpreting the serial number format specific to your model․ Cross-referencing with ANSI code dates or assessing the unit’s condition can help pinpoint the precise year of manufacture․

Determining the Year of Manufacture

Pinpointing a Mitsubishi mini split’s year of manufacture relies heavily on deciphering its serial number․ Typically‚ the initial digit represents the last digit of the production year․ For instance‚ a serial number starting with ‘6’ could indicate either 2006 or 2016․ Accurate determination requires careful consideration․

To resolve this ambiguity‚ examine the unit’s physical condition and correlate it with the ANSI code date located on the data plate․ Your Mitsubishi mini split manual PDF may also provide specific decoding guidance for your model․ Combining these clues offers the most reliable method for establishing the unit’s age․

Common Issues and Troubleshooting

Your Mitsubishi Mini Split manual PDF is invaluable when facing operational hiccups․ Common problems include error codes signaling issues with sensors‚ communication‚ or refrigerant flow․ The manual provides a detailed list of these codes and suggested remedies‚ guiding initial troubleshooting steps․

More serious concerns‚ like suspected refrigerant leaks‚ demand immediate attention․ Mitsubishi manuals strongly emphasize safety – never attempt refrigerant handling without proper certification․ The PDF will outline safe shutdown procedures․ For complex issues‚ consulting a qualified HVAC technician is always recommended‚ referencing the manual’s specifications for accurate diagnosis․

Error Codes and Their Meanings

Mitsubishi Mini Split systems utilize error codes to pinpoint malfunctions‚ and your manual PDF is the key to deciphering them; These codes‚ displayed on the indoor unit‚ indicate problems ranging from simple sensor failures to more complex issues like compressor errors or communication breakdowns between units․

The manual provides a comprehensive table listing each code‚ a clear description of the fault‚ and often‚ suggested troubleshooting steps․ For example‚ a specific code might signal a dirty air filter‚ while another could indicate a refrigerant leak․ Understanding these codes empowers you to address minor issues independently‚ or accurately communicate the problem to a service technician․

Addressing Refrigerant Leaks (Safety First!)

The Mitsubishi Mini Split manual PDF strongly emphasizes safety when dealing with refrigerant․ Refrigerant leaks are hazardous and require professional attention; attempting DIY repairs is strongly discouraged․ The manual details the dangers of refrigerant exposure – potential for frostbite‚ asphyxiation‚ and environmental harm․

If you suspect a leak (indicated by reduced cooling‚ hissing sounds‚ or oil residue near connections)‚ immediately power down the system and ventilate the area․ Your manual will not provide instructions for fixing the leak yourself․ Instead‚ it stresses contacting a qualified HVAC technician for leak detection‚ repair‚ and proper refrigerant recharging‚ adhering to EPA regulations․

DIY Maintenance vs․ Professional Service

The Mitsubishi Mini Split manual PDF clearly delineates tasks homeowners can perform versus those requiring a qualified technician․ DIY maintenance typically includes cleaning air filters regularly – a crucial step for efficiency and air quality․ The manual provides detailed filter cleaning instructions‚ often recommending frequency based on usage․

However‚ tasks involving electrical components‚ refrigerant handling‚ or complex system diagnostics are strictly reserved for professionals․ Attempting these without proper training and tools can void warranties‚ damage the unit‚ and pose safety risks․ The manual emphasizes that professional service ensures optimal performance‚ longevity‚ and adherence to safety standards․

Essential Components Covered in the Manual

The Mitsubishi Mini Split manual PDF provides exhaustive details on all system components․ For the indoor unit‚ it covers features like fan speed control‚ louver adjustments‚ and operational modes (cool‚ heat‚ dry‚ auto)․ Detailed diagrams illustrate airflow patterns and component locations․ The manual also explains indicator lights and their meanings‚ aiding in basic troubleshooting․

Regarding the outdoor unit‚ the manual specifies maintenance requirements‚ including coil cleaning procedures and fan inspection․ It details specifications like power supply requirements and refrigerant charge․ Wiring diagrams for both units are included‚ crucial for understanding the system’s electrical connections and ensuring safe operation․

Indoor Unit Features and Operation

The Mitsubishi Mini Split manual PDF meticulously details indoor unit functionalities․ It explains how to adjust fan speeds for optimal comfort and airflow distribution․ Users learn to utilize various operational modes – cooling‚ heating‚ dry operation (dehumidification)‚ and auto mode for intelligent climate control․ The manual clarifies the purpose of each button on the remote controller‚ including timer settings and temperature adjustments․

Furthermore‚ it illustrates louver adjustments for directing airflow and explains indicator light meanings‚ assisting with quick diagnostics․ Detailed sections cover filter cleaning procedures‚ vital for maintaining air quality and system efficiency․ Diagrams showcase component locations within the indoor unit‚ aiding in understanding its internal workings․

Outdoor Unit Specifications and Maintenance

The Mitsubishi Mini Split manual PDF provides comprehensive outdoor unit specifications‚ including dimensions‚ weight‚ and electrical requirements․ It details proper installation guidelines‚ emphasizing adequate ventilation and secure mounting․ Maintenance sections focus on coil cleaning procedures‚ crucial for maintaining heat transfer efficiency and preventing performance decline․ The manual outlines fan motor inspection protocols and identifies potential issues like unusual noises or vibrations․

It also covers checking refrigerant lines for damage and ensuring proper insulation․ Safety warnings regarding electrical components and high-voltage areas are prominently displayed․ Diagrams illustrate component locations‚ aiding in servicing․ Regular maintenance‚ as outlined‚ extends the unit’s lifespan and optimizes performance․

Reading Wiring Diagrams

Mitsubishi Mini Split manual PDFs contain detailed wiring diagrams essential for installers and technicians․ These diagrams illustrate the connections between the indoor and outdoor units‚ control systems‚ and power sources․ Understanding these schematics is vital for correct installation‚ troubleshooting electrical faults‚ and performing repairs safely․ The manual explains the symbols used‚ clarifying wire colors and terminal designations․

It emphasizes the importance of disconnecting power before working with wiring․ Diagrams often show multiple configurations‚ accommodating different system setups․ Proper grounding procedures are highlighted to prevent electrical hazards․ Following the diagrams precisely ensures optimal system operation and prevents damage to components․

Understanding the Refrigerant Type

Mitsubishi Mini Split manuals clearly state the specific refrigerant used in each model – historically R-22‚ now predominantly R-410A‚ and increasingly R-32․ Knowing the refrigerant type is critical for servicing‚ as mixing refrigerants can severely damage the system․ The manual details proper handling procedures‚ emphasizing the environmental impact and legal regulations surrounding refrigerant management․

It outlines safety precautions when dealing with refrigerant‚ including the need for certified technicians and specialized equipment․ The manual also explains how to identify refrigerant leaks and the correct methods for recharging the system․ Using the wrong refrigerant voids warranties and compromises efficiency․

Safety Precautions

Mitsubishi Mini Split manuals prioritize safety‚ dedicating sections to both electrical and refrigerant handling․ Electrical safety guidelines emphasize disconnecting power before any maintenance‚ proper grounding‚ and avoiding water contact with electrical components․ The manual warns against attempting repairs without qualified technician assistance․

Regarding refrigerant‚ the manual stresses the importance of certified professionals for handling‚ due to potential environmental harm and health risks․ It details proper ventilation during service and the dangers of releasing refrigerant into the atmosphere․ Always follow local regulations for refrigerant disposal․ Ignoring these precautions can lead to serious injury or system damage․

Electrical Safety Guidelines

Mitsubishi Mini Split manuals consistently emphasize disconnecting the power supply before performing any maintenance or servicing․ This prevents electrical shock and potential damage to the unit’s components․ Proper grounding is crucial; ensure the system is correctly grounded according to local electrical codes․ Avoid any contact between water and electrical parts – even seemingly minor moisture can create a hazardous situation․

The manuals strongly advise against attempting electrical repairs unless you are a qualified and licensed technician․ Incorrect wiring or component replacement can lead to fire hazards or system malfunction․ Always inspect wiring for damage before re-energizing the unit‚ and never bypass safety devices․

Handling Refrigerant Responsibly

Mitsubishi Mini Split manuals provide strict guidelines regarding refrigerant handling‚ emphasizing its potential environmental impact and safety concerns․ Refrigerant leaks must be addressed immediately by a certified technician‚ as it’s illegal to intentionally release refrigerant into the atmosphere․ The manuals detail proper procedures for recovery‚ recycling‚ and disposal of refrigerant‚ adhering to EPA regulations․

Never attempt to repair refrigerant lines yourself; specialized tools and training are required․ The manuals warn against inhaling refrigerant vapor‚ as it can cause serious health issues․ Always wear appropriate personal protective equipment‚ including gloves and eye protection‚ when working near refrigerant lines․

Where to Find Additional Resources

Beyond the Mitsubishi Mini Split manual PDF‚ several resources offer support․ Mitsubishi’s official website (https://www․mitsubishihvac․com/) hosts a comprehensive FAQ section‚ troubleshooting guides‚ and updated documentation․ Online forums and communities dedicated to HVAC systems‚ like those found on Reddit or specialized HVAC websites‚ provide platforms for users to share experiences and solutions․

These forums often contain discussions about specific model numbers and common issues․ Remember to verify information found on forums with official Mitsubishi resources․ Local HVAC professionals can also offer valuable assistance and expertise‚ especially for complex repairs or installations․

Mitsubishi’s Official Website

Mitsubishi’s official website is the primary source for authentic Mini Split manual PDFs and support materials․ Navigating to their HVAC section (https://www․mitsubishihvac;com/) allows users to search for manuals by model number‚ ensuring they access the correct documentation․ The site also features detailed product specifications‚ troubleshooting guides‚ and warranty information․

Furthermore‚ Mitsubishi frequently updates its online resources with the latest revisions and FAQs․ Registration on the website may unlock access to exclusive content and support options․ Utilizing the official website guarantees access to accurate and reliable information directly from the manufacturer‚ avoiding potential inaccuracies found elsewhere․

Online Forums and Communities

Numerous online forums and communities dedicated to HVAC systems‚ particularly Mitsubishi Mini Splits‚ offer valuable resources for locating manual PDFs and troubleshooting assistance․ Platforms like HVAC-Talk and dedicated Reddit subreddits often host threads where users share links to manuals or discuss specific model number issues․

These communities can be incredibly helpful for finding manuals not readily available on the official website‚ or for gaining insights from experienced users regarding common problems and solutions․ However‚ always verify the accuracy of information obtained from forums‚ as it’s user-generated content․ Cross-referencing with official Mitsubishi documentation is recommended․

Manual Updates and Revisions

Mitsubishi Electric frequently updates its manuals to reflect design changes‚ address discovered issues‚ and incorporate new safety information․ It’s crucial to ensure you have the most current PDF version for your specific model number․ Older manuals may contain inaccurate or outdated instructions‚ potentially leading to improper installation or maintenance․

Check the official Mitsubishi website regularly for revised manuals․ Pay attention to the revision date listed on the document․ Downloading the latest version guarantees you’re working with the most accurate guidance‚ maximizing system performance and safety․ Ignoring updates could void warranties or create hazardous conditions․

Specific Model Series Manuals (Examples)

Locating the correct manual hinges on your Mitsubishi mini split series․ For the MSZ-FS Series‚ manuals detail advanced features like i-see Sensor Array and hyper-heating technology․ The MSZ-GL Series manuals focus on standard efficiency models‚ providing clear installation and basic operation instructions․

Each series manual offers unique troubleshooting guides and wiring diagrams tailored to its components․ Always cross-reference the model number on your unit with the manual’s compatibility list․ Mitsubishi’s website provides direct links to these series-specific PDFs‚ ensuring you access the precise documentation needed for your system․

MSZ-FS Series Manuals

MSZ-FS Series manuals cover Mitsubishi’s premium systems‚ renowned for their advanced features․ These PDFs detail the i-see Sensor Array‚ which optimizes airflow for personalized comfort‚ and hyper-heating technology‚ ensuring efficient warmth even in frigid temperatures․ Installation guides are comprehensive‚ emphasizing proper refrigerant handling and electrical connections․

Troubleshooting sections focus on unique error codes specific to the FS Series‚ alongside detailed wiring diagrams․ Users will find information on filter cleaning‚ coil maintenance‚ and remote control operation․ Accessing the correct MSZ-FS manual‚ matched to your exact model number‚ is vital for maximizing system performance and longevity․

MSZ-GL Series Manuals

MSZ-GL Series manuals provide essential guidance for operating Mitsubishi’s widely-used‚ energy-efficient mini-split systems․ These PDFs outline the basic functions‚ including cooling‚ heating‚ and dehumidification modes‚ alongside detailed explanations of the remote controller’s features․ Installation instructions emphasize proper unit placement and condensate drain setup․

Troubleshooting guides address common issues like fan noise or insufficient cooling‚ referencing specific error codes․ Maintenance sections detail filter cleaning procedures and recommend periodic professional servicing․ Finding the correct MSZ-GL manual‚ corresponding to your precise model number‚ ensures optimal performance and extends the system’s lifespan․

field and stream 1871 gun safe manual

Field & Stream 1871 Gun Safe Manual: A Comprehensive Guide

This comprehensive guide details operation, maintenance, and troubleshooting for your Field & Stream 1871 gun safe.
Preserve this manual; failing to follow instructions voids the warranty.
Accessing override keys and locksmith assistance are also covered.

Understanding Your Field & Stream 1871 Safe

Your Field & Stream 1871 gun safe represents a significant investment in protecting your firearms and valuables. This model, manufactured with robust steel construction, offers reliable security when used correctly.
Understanding its features and operational procedures is crucial for maximizing its protective capabilities.

The 1871 series often features either a mechanical dial lock or, in some later models, an electronic keypad.
Regardless of the locking mechanism, proper operation is paramount.
Do not store the manual or override keys inside the safe, as this defeats the purpose of security.
Regularly consult this manual to refresh your knowledge of safe operation and maintenance procedures.

Remember, proper usage directly impacts warranty validity, so familiarize yourself with all outlined guidelines.

Historical Context of Field & Stream Safes

Field & Stream has a long-standing reputation for quality outdoor products, and their gun safes reflect this heritage. While the exact origins of their safe manufacturing are less documented than some competitors, the brand consistently aimed to provide reliable security solutions for sportsmen.

The 1871 model signifies a period where Field & Stream focused on blending affordability with dependable protection. These safes were designed to meet the needs of a growing market of gun owners seeking secure storage.

Over time, Field & Stream safes evolved, incorporating features like electronic locks and improved fire resistance. However, the core principle of providing robust security remained constant. Understanding this historical context highlights the brand’s commitment to safeguarding valuable possessions.

Key Features of the 1871 Model

The Field & Stream 1871 gun safe boasts several key features designed for reliable firearm storage. Primarily, it utilizes a mechanical dial lock, offering a traditional and robust security method. The safe’s construction incorporates heavy-gauge steel, providing resistance against forced entry.

Interior configurations typically accommodate up to 14 long guns, alongside additional storage for pistols and valuables. Many models feature adjustable shelving to customize the interior layout.

While fire protection levels vary, the 1871 generally offers a degree of fire resistance, safeguarding contents during a fire. It’s crucial to retain the override keys, as they provide emergency access if the combination is forgotten.

Opening Your Field & Stream 1871 Gun Safe

Opening procedures depend on your safe’s lock type – mechanical dial or electronic keypad. Carefully follow the step-by-step instructions to avoid lockout issues.

Mechanical Dial Operation ⎼ Step-by-Step

To open your Field & Stream 1871 with a mechanical dial, begin by slowly rotating the dial clockwise, passing the start point multiple times. This ensures proper cam alignment.

Next, slowly rotate the dial counter-clockwise, stopping precisely on your first number. Then, rotate clockwise again, passing the start point and stopping accurately on your second number. Repeat this process for all numbers in your combination.

Finally, after entering the last number, apply firm and steady pressure as you rotate the handle counter-clockwise. The bolt work should release, allowing you to open the safe door. If it doesn’t, double-check your combination and repeat the process carefully.

Remember, slow and precise movements are key!

Electronic Lock Operation (If Applicable)

If your Field & Stream 1871 safe features an electronic lock, operation is straightforward. Begin by entering your pre-set security code using the keypad. Ensure the keypad is fully illuminated before inputting the code.

After entering the correct code, listen for a confirmation beep or visual indicator signifying successful entry. Simultaneously, turn the handle to retract the locking bolts and open the safe door.

You can typically adjust the keypad sound (on/off) through the lock’s settings menu. Regularly check and replace the batteries to prevent lockout. Low battery warnings are usually indicated by a flashing light or audible signal. Refer to the lock’s specific instructions for detailed battery replacement procedures.

Troubleshooting Common Opening Issues

If encountering difficulty opening your Field & Stream 1871 safe, first verify correct combination entry. For mechanical dials, ensure precise alignment with each number. With electronic locks, confirm sufficient battery power and accurate code input.

A stiff or unresponsive dial may require lubrication (see Maintenance section). If the handle doesn’t turn, avoid excessive force; this could damage the locking mechanism. Repeated failed attempts on electronic locks may trigger a lockout – consult the lock’s manual for reset procedures.

If issues persist, avoid attempting self-repair. Contact a professional locksmith specializing in gun safes for assistance. Document any error messages or unusual behavior for the locksmith’s benefit.

Changing the Combination

Safeguard your valuables by periodically changing your Field & Stream 1871 safe’s combination. This manual details procedures for both mechanical and electronic lock systems.

Changing the Mechanical Combination

Changing the mechanical combination on your Field & Stream 1871 safe requires careful attention to detail. Begin by obtaining a qualified locksmith’s assistance if you’re uncomfortable with the process. The procedure typically involves removing the dial, accessing the cam and drive wheels, and carefully re-notching them to create the new combination.

Important: Document the original combination before making any changes! Ensure each wheel is correctly aligned and secured after re-notching. Improper alignment can render the safe unusable. After completing the changes, thoroughly test the new combination multiple times to confirm functionality. Do not store the new combination within the safe itself or alongside the override keys.

Remember, altering the internal mechanisms can void your warranty if not performed correctly. Professional assistance is highly recommended for optimal security and peace of mind.

Changing the Electronic Combination

Changing the electronic combination on your Field & Stream 1871 safe, if equipped, is generally straightforward. Begin by entering the master code, often the factory-set default. Access the programming mode through the keypad, typically by pressing a designated “Program” or “Code” button. Follow the on-screen prompts to input the new desired code.

Crucially, memorize the new code immediately and test it several times to ensure correct functionality. Some models allow for multiple user codes; utilize this feature for enhanced security. Do not write the code on or near the safe. Battery replacement may require re-entering the code, so keep a record in a secure, separate location.

Refer to the specific model’s instructions, as procedures can vary.

Important Security Considerations When Changing Combinations

Prioritize security when altering your Field & Stream 1871 safe’s combination. Never select easily guessable codes like birthdays or sequential numbers. A strong code incorporates a random mix of digits; Avoid writing the combination anywhere near the safe itself – this defeats the purpose of security.

Crucially, inform only those who absolutely need to know the new combination. Regularly changing the combination, perhaps annually, enhances protection. Do not share the combination with service personnel unless absolutely necessary, and if so, change it afterward.

Remember, the safe’s security relies on the confidentiality of the combination. Keep override keys separate and secure, and never store them inside the safe.

Maintenance and Care

Regularly lubricate locking mechanisms to ensure smooth operation. Clean both the interior and exterior to prevent rust and corrosion, preserving your Field & Stream safe.

Lubrication of Locking Mechanisms

Maintaining proper lubrication is crucial for the longevity and reliable function of your Field & Stream 1871 safe’s locking system. Use a high-quality silicone-based lubricant specifically designed for firearms or precision mechanisms. Avoid using oil-based lubricants, as they can attract dust and grime, ultimately hindering performance.

Apply a small amount of lubricant to all moving parts of the lock, including the dial, bolt work, and any visible levers. Rotate the dial several times after application to distribute the lubricant evenly.

Frequency of lubrication depends on usage and environmental conditions. Generally, lubricating the locking mechanism every six months is recommended. In dusty or humid environments, more frequent lubrication may be necessary. Always refer to the full manual for specific guidance.

Cleaning the Safe Interior and Exterior

Regular cleaning preserves your Field & Stream 1871 safe’s appearance and prevents corrosion. For the exterior, use a mild soap and water solution with a soft cloth. Avoid abrasive cleaners that could damage the finish. Dry thoroughly after cleaning.

The interior should be vacuumed periodically to remove dust and debris. Inspect for any signs of moisture or rust. If rust is present, carefully remove it with a rust remover specifically designed for firearms, following the product’s instructions.

Avoid using harsh chemicals or solvents inside the safe, as they could damage firearm finishes or other stored valuables. A dry cloth is often sufficient for routine interior cleaning. Refer to the complete manual for detailed cleaning recommendations.

Preventing Rust and Corrosion

Rust and corrosion are significant threats to firearms and valuables stored within your Field & Stream 1871 safe. Maintaining a dry environment is crucial; consider using desiccant dehumidifiers inside the safe to absorb moisture. Regularly inspect firearms for any signs of rust, addressing them immediately with appropriate rust removal products.

Proper firearm storage, including cleaning and oiling before storage, significantly reduces corrosion risk. Avoid storing firearms directly on the safe’s floor; use gun racks or mats to promote air circulation. The manual emphasizes the importance of climate control.

Ensure the safe is located in a dry area, away from potential water sources. Consistent monitoring and preventative measures, as outlined in the manual, will safeguard your investments.

Lost Combination & Override Procedures

Lost your combination? Locate override keys – never store them in the safe! Professional locksmith assistance is recommended; documentation proves ownership for access.

Locating and Using Override Keys

Your Field & Stream 1871 safe includes override keys for emergency access when the combination is forgotten or the locking mechanism malfunctions. Crucially, DO NOT lock these keys inside the safe – this defeats their purpose! These keys were provided with your safe at the time of purchase and should be stored in a secure, separate location known only to authorized individuals.

To use the override keys, locate the keyhole typically found near the lock mechanism. Insert the appropriate key and turn it gently while simultaneously applying pressure to the safe handle. The door should unlock. Note: Using the override keys bypasses the combination lock and should only be used in genuine emergencies. After using the override, it’s highly recommended to contact a qualified locksmith to reset the combination for continued security.

Professional Locksmith Assistance

If you’ve lost your combination, are experiencing persistent locking issues, or have unsuccessfully attempted to use the override keys, contacting a professional locksmith specializing in gun safes is crucial. Attempting to force the safe open yourself can cause significant damage and void your warranty.

A qualified locksmith possesses the tools and expertise to safely open your Field & Stream 1871 safe without causing harm. They can also reset the combination, repair damaged locking mechanisms, and provide advice on enhancing your safe’s security. When contacting a locksmith, be prepared to provide proof of ownership and potentially documentation related to the safe’s original purchase and override access.

Documentation Requirements for Override Access

Accessing your Field & Stream 1871 safe via the override key requires strict adherence to documentation protocols. To prevent unauthorized access and ensure security, you must present valid proof of ownership. Acceptable documents typically include the original purchase receipt, a bill of sale, or a valid government-issued photo ID matching the safe’s registered owner.

Furthermore, you may need to provide the safe’s serial number and any accompanying documentation received with the override keys. Do not store the manual or override keys inside the safe. Locksmiths or authorized service centers will verify this information before granting access, safeguarding against potential misuse.

Warranty Information

Warranty coverage details, the claim process, and important reminders for preserving your Field & Stream 1871 safe’s warranty are outlined.
Review these details carefully!

Warranty Coverage Details

Field & Stream gun safes, including the 1871 model, are warranted against manufacturing defects in materials and workmanship for the lifetime of the safe’s original ownership. This warranty covers defects in the steel, locking mechanisms, and overall construction. However, it does not cover damage resulting from misuse, abuse, neglect, unauthorized modifications, or acts of God.

Specifically, the warranty excludes damage from fire, flood, earthquake, or attempted forced entry. Cosmetic imperfections that do not affect the safe’s functionality are also not covered. Transfer of ownership voids the lifetime warranty, meaning it applies only to the original purchaser. Proper safe placement and anchoring, as outlined in the safety precautions, are crucial for maintaining warranty validity.

Warranty Claim Process

To initiate a warranty claim for your Field & Stream 1871 gun safe, you must first contact customer support with detailed documentation of the defect. This includes clear photographs or videos illustrating the issue, proof of purchase (original receipt), and a written description of the problem.

Do not attempt to repair the safe yourself, as this will immediately void the warranty. A representative will assess your claim and, if approved, provide instructions for returning the safe or scheduling an on-site inspection. Shipping costs for warranty repairs are the responsibility of the purchaser. Keep all communication records related to your claim for future reference.

Preserving Your Warranty ‒ Important Reminders

Maintaining your Field & Stream 1871 safe’s warranty requires diligent adherence to several key guidelines. Never store the owner’s manual or override keys inside the safe itself – this immediately voids coverage. Regular lubrication of locking mechanisms, as outlined in the maintenance section, is crucial.

Avoid unauthorized modifications or repairs; only qualified technicians should service the safe. Retain your original proof of purchase for the duration of the warranty period. Failure to follow these simple steps can invalidate your warranty, leaving you responsible for any repair costs.

Safety Precautions

Securely anchor your Field & Stream 1871 safe to prevent tipping or removal. Practice responsible firearm storage, and avoid accidental lockouts by familiarizing yourself with procedures.

Safe Placement and Anchoring

Proper placement is crucial for Field & Stream 1871 safe security. Choose a level, solid floor, avoiding upper levels or areas prone to flooding. Consider accessibility for frequent use, but prioritize concealment.

Anchoring significantly deters theft. Utilize the provided anchoring hardware to secure the safe to the floor or a wall stud. Concrete floors require specialized anchors, sold separately. Ensure the anchoring point can withstand substantial force.

Bolting the safe prevents removal, even if thieves bypass the lock. Regularly inspect anchors for tightness. A well-placed and anchored safe provides a substantial deterrent and peace of mind, protecting your valuables and family.

Proper Firearm Storage Practices

Secure firearm storage within your Field & Stream 1871 safe is paramount for safety and legal compliance. Always store firearms unloaded, with ammunition stored separately. Utilize gun racks or dividers to prevent accidental contact and damage.

Consider using gun socks or sleeves to protect firearms from scratches and corrosion. Maintain a dry environment inside the safe to prevent rust. Regularly inspect firearms for proper functioning and cleanliness, even while stored.

Responsible gun ownership includes preventing unauthorized access, especially by children or individuals prohibited from possessing firearms. Your safe is a vital component of this responsibility, ensuring both safety and security.

Avoiding Accidental Lockouts

Preventing lockouts with your Field & Stream 1871 safe requires diligence. Regularly practice opening the safe with your combination to maintain muscle memory and familiarity. Avoid forcing the dial or handle, as this can damage the locking mechanism.

Never store the safe’s manual or override keys inside the safe itself – this defeats the purpose of secure storage! Keep a record of your combination in a secure, separate location, away from the safe.

If you experience difficulty opening the safe, consult the troubleshooting section of this manual before attempting forceful entry. Remember, professional locksmith assistance is available if needed.

yamaha rx v673 manual

Welcome to the Yamaha RX-V673 manual guide. This comprehensive resource provides detailed instructions for setting up, configuring, and troubleshooting your AV receiver, ensuring optimal performance and unlocking all features effectively.

Overview of the Yamaha RX-V673 AV Receiver

The Yamaha RX-V673 is a high-performance 7.2-channel AV receiver designed to deliver exceptional audio and video quality. It supports 4K pass-through and upscaling, ensuring compatibility with the latest high-resolution video formats. Equipped with YPAO R.S.C. technology, it optimizes speaker settings for precise sound calibration. The receiver also features built-in Wi-Fi, enabling seamless network connectivity and streaming capabilities. With advanced features like HDMI 4K upscaling and robust audio processing, the RX-V673 is a versatile hub for home theater systems, offering both power and flexibility for an immersive entertainment experience.

Importance of Reading the Manual

Reading the Yamaha RX-V673 manual is crucial for maximizing your AV receiver’s potential. It provides essential guidance for installation, configuration, and troubleshooting, ensuring optimal performance. The manual details advanced features like 4K upscaling, Wi-Fi setup, and audio calibration, helping users customize their experience. By understanding the settings and connectivity options, you can avoid common issues and enjoy a seamless home theater experience. Referencing the manual ensures you unlock all features and maintain your receiver’s functionality, making it indispensable for both setup and ongoing use.

Structure of the Manual

The Yamaha RX-V673 manual is organized into clear sections for easy navigation. It begins with an introduction, followed by safety precautions and product features. Detailed installation and setup instructions guide users through initial configuration and connectivity. Advanced customization options are explained, along with troubleshooting solutions for common issues. The manual also includes maintenance tips and user-friendly advice for optimizing performance. Additional resources, such as the Safety Brochure and quick setup guides, are referenced for comprehensive support. This structured approach ensures users can efficiently find the information they need to maximize their AV receiver experience.

Safety Precautions and Guidelines

Read the supplied Safety Brochure carefully before using the Yamaha RX-V673. Ensure proper handling and placement to avoid damage or electrical hazards.

General Safety Information

Always read the Safety Brochure provided with the Yamaha RX-V673 to ensure safe operation. Avoid exposing the unit to water, extreme temperatures, or electrical surges. Proper ventilation is essential to prevent overheating. Never open the receiver’s casing, as this can lead to electrical shock or damage. Ensure all connections are secure to avoid short circuits. Follow all guidelines to prevent accidents and maintain optimal performance. Failure to comply may result in damage or pose safety risks.

Power Supply and Voltage Requirements

The Yamaha RX-V673 operates on AC power and requires a stable voltage supply to function correctly. Ensure your power source matches the receiver’s voltage rating, typically 120V or 230V, depending on your region. Use a high-quality power cable to prevent electrical interference. Avoid using extension cords or overloaded circuits, as this can cause instability. Unplug the receiver during lightning storms or power outages to protect against voltage spikes. Proper power management ensures reliable operation and extends the lifespan of your AV receiver.

Handling and Placement Guidelines

Handle the Yamaha RX-V673 with care to avoid damage. Place it on a stable, flat surface in a well-ventilated area to ensure proper heat dissipation. Avoid exposing the receiver to direct sunlight, moisture, or extreme temperatures. Keep it away from magnetic fields and sources of interference. Ensure adequate space around the unit for airflow. Do not place heavy objects on top of the receiver. Clean the exterior gently with a soft cloth. For optimal performance, position the receiver in a location that minimizes vibration and ensures easy access to controls and connections.

Product Features and Specifications

The Yamaha RX-V673 is a 7.2-channel AV receiver, supporting 4K Ultra HD, HDR, and immersive audio formats like Dolby Atmos and DTS:X. It features YPAO sound calibration, dual HDMI outputs, and robust connectivity options for a seamless home theater experience.

Audio Features of the Yamaha RX-V673

The Yamaha RX-V673 offers exceptional audio capabilities, including support for Dolby Atmos and DTS:X for immersive soundscapes. It features Yamaha’s proprietary YPAO R.S.C. calibration technology, ensuring precise speaker setup and room acoustics optimization. The receiver also supports high-resolution audio formats like FLAC, ALAC, and WAV. With 7.2-channel processing, it delivers powerful, balanced sound. Additional features include Dialogue Lift for enhanced vocal clarity and ECO mode for reduced power consumption, making it both versatile and eco-friendly for various listening experiences.

Video Features and Capabilities

The Yamaha RX-V673 excels in video performance, supporting 4K pass-through and upscaling for stunning high-resolution visuals. It features HDMI 2.0 with HDCP 2.2, ensuring compatibility with the latest 4K devices. The receiver also supports HDR (High Dynamic Range), enhancing contrast and color accuracy for a more immersive viewing experience. With advanced video processing technologies, it minimizes noise and optimizes color reproduction, delivering crisp and vibrant images. These capabilities make the RX-V673 an ideal centerpiece for modern home theater systems, ensuring exceptional video quality across all connected devices.

Connectivity Options and Ports

The Yamaha RX-V673 offers extensive connectivity options, featuring multiple HDMI inputs and outputs, supporting 4K and 3D video pass-through. It includes optical and coaxial digital audio inputs for high-quality sound transmission. Additionally, the receiver provides USB ports for connecting external storage devices and supporting wireless connectivity through Wi-Fi and Bluetooth. Dual LAN ports enable stable network connections, ensuring seamless integration with smart home systems. These versatile connectivity options allow users to easily connect a wide range of devices, enhancing their home theater experience with flexibility and convenience.

Compatibility with External Devices

The Yamaha RX-V673 seamlessly integrates with various external devices, including Blu-ray players, gaming consoles, and smart TVs. It supports AirPlay for wireless music streaming from Apple devices and is compatible with Yamaha’s MusicCast system for multi-room audio. The receiver also works with external amplifiers and speakers, allowing for flexible system expansion. Its compatibility with devices like Roku, PS3, and TiVo ensures a comprehensive home theater setup. This versatility makes the RX-V673 a central hub for diverse entertainment systems, enhancing overall performance and user experience.

System Requirements and Compatibility

Ensure your Yamaha RX-V673 operates smoothly by meeting system requirements, including compatible audio and video formats, network standards, and device connectivity for optimal performance and functionality.

Supported Audio Formats

The Yamaha RX-V673 supports a wide range of audio formats, including Dolby TrueHD, DTS-HD Master Audio, and PCM. It also features compatibility with popular codecs like FLAC, ALAC, and WAV, ensuring high-quality sound reproduction. Additionally, the receiver supports multi-channel audio formats, enhancing your home theater experience. This versatility allows seamless playback of audio from various sources, such as Blu-ray discs, streaming services, and external devices. Properly configuring these formats ensures optimal performance and compatibility with your entertainment setup.

Supported Video Formats

The Yamaha RX-V673 supports various video formats, including 4K/60Hz, HDR (High Dynamic Range), and Wide Color Gamut, ensuring compatibility with the latest high-resolution content. It features HDMI 2.0 for enhanced video pass-through and upscaling capabilities, allowing you to enjoy crystal-clear visuals. The receiver also supports Dolby Vision and Hybrid Log-Gamma (HLG) formats, providing immersive viewing experiences. These advanced video technologies ensure seamless integration with modern devices and content, making the RX-V673 a versatile choice for home theater systems. Proper configuration of these formats is essential for optimal video performance.

Device Compatibility

The Yamaha RX-V673 is designed to work seamlessly with a wide range of devices, including 4K TVs, Blu-ray players, gaming consoles, and streaming devices. It supports HDMI 2.0, ensuring compatibility with the latest hardware. The receiver also integrates with AirPlay-enabled devices, allowing wireless audio streaming from Apple products. Additionally, it supports Wi-Fi and Ethernet connections for network-based features. This versatility makes the RX-V673 a central hub for modern home entertainment systems, capable of connecting and enhancing various audio and video sources efficiently.

Network and Wi-Fi Requirements

For optimal performance, the Yamaha RX-V673 requires a stable internet connection. It supports Wi-Fi and Ethernet connectivity, ensuring seamless integration with network-based features. The receiver is compatible with WPS (Wi-Fi Protected Setup) for easy connection to your home network. A minimum internet speed of 5 Mbps is recommended for smooth operation of online services. Ensure your router is configured correctly and supports standard Wi-Fi protocols. Regular firmware updates via the network are essential for maintaining performance and adding new features. Proper network setup enhances the receiver’s functionality, enabling features like AirPlay and online streaming services.

Installation and Setup

Unpack and physically install the receiver, ensuring proper placement and ventilation. Connect all devices via HDMI and other ports, then power on and configure settings using the remote.

Unpacking and Physical Installation

Begin by carefully unpacking the Yamaha RX-V673 AV receiver, ensuring all components are included and undamaged. Place the receiver on a stable, flat surface, away from direct sunlight and moisture. Ensure proper ventilation to prevent overheating. Position the unit in a well-ventilated area, avoiding confinement in enclosed spaces. Connect the power cord securely, and organize all cables neatly to maintain a clutter-free setup. Double-check all connections for tightness and proper alignment. Once installed, proceed to power on the receiver and follow the on-screen prompts for initial configuration.

Connecting Speakers and External Devices

Connect your speakers to the Yamaha RX-V673 by matching the positive and negative terminals to the appropriate outputs. Use high-quality speaker cables for optimal sound. For external devices, utilize the HDMI, optical, and coaxial inputs for seamless integration with your TV, Blu-ray player, and gaming console. Ensure all connections are secure to avoid signal loss. Configure the input settings via the on-screen menu to assign the correct audio and video sources. Properly label each connection for easy identification and future adjustments. This setup ensures a robust and immersive home theater experience.

Initial Power-On and Basic Configuration

After connecting all devices, turn on the Yamaha RX-V673 using the power button. Use the remote control to navigate to the setup menu. Select your preferred language and input source. Configure the remote control to operate external devices like your TV or Blu-ray player. Ensure the HDMI settings are correctly assigned for proper audio and video routing. Use the YPAO (Yamaha Parametric Room Acoustic Optimizer) calibration tool to automatically adjust speaker settings for optimal sound quality. Once configured, save your settings to enjoy a seamless entertainment experience.

Updating Firmware

To ensure optimal performance, regularly update the Yamaha RX-V673 firmware. Access the update option via the on-screen menu under the “Setup” or “System” section. Connect the receiver to your network for an over-the-air update. Download and install the latest firmware, following on-screen instructions. Do not power off the receiver during the update. Once completed, restart the device to apply changes. If issues arise during the update, refer to the troubleshooting section in the manual or contact Yamaha customer support for assistance.

Configuration and Customization

Explore the Yamaha RX-V673’s setup menu to customize audio and video settings. Adjust HDMI settings, speaker configurations, and network preferences for enhanced performance and personalized home theater experience.

Basic Setup Menu Navigation

The Yamaha RX-V673 manual guides users through the basic setup menu navigation, ensuring a smooth and intuitive configuration process. Access the menu by pressing the Menu button on the remote, then use the arrow keys to navigate through options like Input, Audio, and Video settings. From there, users can customize settings such as HDMI input labels, audio output modes, and video resolutions to suit their preferences. This section also covers enabling features like ECO mode and setting up the remote control for seamless operation.

Advanced Setup Options

The Yamaha RX-V673 manual delves into advanced setup options, offering users precise control over their AV receiver. These include detailed audio calibration via YPAO R.S.C., manual speaker impedance adjustments, and custom EQ settings. Users can also configure Zone 2 settings for multi-room audio and enable features like Dialogue Lift for enhanced vocal clarity. Additionally, the manual covers network configuration for wireless connectivity and explains how to assign custom inputs for tailored home theater experiences. These advanced options allow users to optimize their system for peak performance and personalized enjoyment.

Customizing Audio Settings

The Yamaha RX-V673 manual provides extensive guidance on customizing audio settings to suit your preferences. Users can adjust tone controls, including bass and treble, and utilize the EQ settings for precise sound shaping. The manual also explains how to enable features like Dialogue Level Adjustment for clearer vocals and Dialogue Lift for optimal dialogue placement. Additionally, it covers configuring extra bass settings for subwoofer enhancement and setting up audio delay for synchronization with video. These options allow users to tailor their audio experience to their listening environment and personal taste, ensuring immersive sound quality.

Configuring Video Settings

The Yamaha RX-V673 manual guides users through configuring video settings for optimal performance. It explains how to enable 4K pass-through and upscaling, ensuring compatibility with the latest high-resolution video formats. The manual details navigating the HDMI menu to adjust settings like color space and resolution. Users can also customize video processing options, such as noise reduction and sharpness, to enhance image quality. Additionally, it covers enabling features like HDMI-CEC for seamless control of connected devices. These settings ensure a pristine visual experience tailored to your home theater setup.

Network and Wi-Fi Configuration

The Yamaha RX-V673 manual provides clear steps for network and Wi-Fi configuration. Users can connect via WPS (Wi-Fi Protected Setup) for quick setup or manually through the menu. The manual guides navigating to the network setup menu, selecting the Wi-Fi network, and entering the password. It also covers advanced options like wireless encryption settings; For wired connections, the receiver supports Lan ports to ensure a stable network connection. Proper configuration enables features like AirPlay, internet radio, and firmware updates, enhancing your home theater experience with seamless connectivity.

Troubleshooting Common Issues

Address common issues like no sound, distorted audio, or video problems by checking connections, restarting the receiver, and consulting the manual for specific solutions and diagnostics.

No Sound or Distorted Audio

If experiencing no sound or distorted audio, ensure all connections are secure and correctly configured. Verify input selection matches the source device. Check speaker settings for proper impedance and power amplifier assignments. Restart the receiver and connected devices to reset connections. If issues persist, review the manual’s troubleshooting section for advanced solutions, such as resetting audio settings or updating firmware. Consulting the Yamaha support resources may also provide additional diagnostics and repair options for optimal audio performance.

Video Issues and Display Problems

For video issues or display problems, ensure all HDMI connections are secure and properly configured. Verify the correct input is selected on both the receiver and display device. Check that the HDMI settings match the display’s capabilities, such as 4K resolution or HDR support. Restart the receiver and connected devices to resolve potential signal errors. If issues persist, adjust the display settings in the receiver’s menu or update the firmware to the latest version. Consult the manual or Yamaha support for further troubleshooting steps to restore optimal video performance.

Network Connectivity Problems

If experiencing network connectivity issues, restart the receiver and router to reset the connection. Ensure the receiver is connected to the correct Wi-Fi network and that the password is entered correctly. Check the router’s settings to confirm the receiver is allowed access. If using a wired connection, verify the Ethernet cable is securely plugged in. Update the receiver’s firmware to the latest version, as outdated software may cause connectivity problems. Refer to the manual’s troubleshooting section or contact Yamaha support for additional assistance to resolve network issues effectively.

Firmware Update Issues

If you encounter firmware update issues, restart the receiver and retry the update process. Ensure a stable internet connection and verify that the update source is correct. If the update fails, check for corrupted files or interruptions during the download. Resetting the receiver to factory settings may resolve persistent issues. For severe problems, refer to the manual’s troubleshooting section or contact Yamaha customer support for assistance. Regular firmware updates are crucial for optimal performance, so addressing these issues promptly ensures your receiver functions at its best.

Maintenance and Care

Regular maintenance ensures optimal performance. Clean the receiver with a soft cloth, update software periodically, and inspect for hardware issues. Store in a cool, dry place.

Cleaning the Receiver

Regular cleaning is essential to maintain the Yamaha RX-V673’s performance. Use a soft, dry cloth to gently wipe the exterior and controls, avoiding harsh chemicals or liquids. For dust buildup, turn off the receiver, unplug it, and use compressed air to carefully clean vents and ports. Avoid spraying liquids directly on the unit, as this could damage internal components. Clean the remote control with a soft cloth lightly dampened with water. Proper maintenance ensures longevity and prevents malfunction. Always power down before cleaning to safeguard your device.

Updating Software Regularly

Regular software updates are crucial for maintaining optimal performance of the Yamaha RX-V673. To update, connect the receiver to your network via Ethernet or Wi-Fi and navigate to the Setup menu. Select System and then Firmware Update to check for and install the latest version. Ensure the receiver is powered on and connected to the internet during the process. Updates may enhance features, improve compatibility, and fix issues. Always follow on-screen instructions carefully to avoid interruptions. For manual updates, download the firmware from Yamaha’s official website and transfer it via USB. Regular updates ensure your receiver stays up-to-date with the latest technologies and improvements.

Checking for Hardware Issues

Regularly inspect the Yamaha RX-V673 for hardware issues to ensure optimal performance. Check all cables and connections for looseness or damage. Verify that no ports are obstructed or corroded. Look for signs of physical damage, such as dents or scratches, which could affect functionality. Ensure proper ventilation to prevent overheating. If you notice any abnormalities, consult the manual or contact Yamaha support for assistance. Addressing hardware issues promptly helps maintain reliability and prevents further complications. Always power off the receiver before inspecting internal components.

Storing the Receiver

When storing the Yamaha RX-V673, ensure it is in a cool, dry place away from direct sunlight and moisture. Use the original packaging if available to protect against dust and physical damage. Avoid extreme temperatures or humidity, as this can harm internal components. Clean the receiver with a soft cloth before storage to prevent dust buildup. Keep it upright to maintain proper structural integrity. Disconnect all cables and accessories to prevent damage. Periodically inspect the receiver during long-term storage to ensure no degradation occurs. Proper storage helps preserve the receiver’s performance and longevity.

User Tips and Tricks

  • Optimize audio quality by calibrating speakers with YPAO.
  • Regularly update firmware for enhanced performance.
  • Experiment with sound modes for different scenarios.
  • Use HDMI pass-through for seamless 4K video.
  • Customize settings for personalized listening experiences.

Optimizing Audio Quality

To achieve the best sound, use the YPAO (Yamaha Parametric Room Acoustic Optimizer) calibration tool for precise speaker setup. Ensure proper placement and connection of bi-amp-compatible front speakers for enhanced clarity. Adjust the Dialogue Level and Extra Bass settings to tailor sound to your preference. Enable features like Adaptive Dynamic Range Compression for balanced audio at low volumes. Experiment with sound modes like Movie, Music, and Game to match your content. Use high-quality HDMI cables for lossless audio transmission. Regularly update firmware for improved performance and stability. Refer to the manual for advanced calibration tips to maximize your listening experience.

Maximizing Video Performance

For optimal video quality, enable 4K pass-through and upscaling on the Yamaha RX-V673. Adjust HDMI settings via the menu to ensure compatibility with your display. Use high-speed HDMI cables to maintain 4K resolution and HDR support. Enable features like Deep Color and x.v.Color for enhanced color accuracy. Configure the HDMI output settings to match your TV’s capabilities. Ensure the receiver and TV are set to the same refresh rate for smooth playback. Refer to the manual for guidance on advanced video calibration to achieve the best visual experience for your movies and games.

Using Advanced Features Effectively

Explore the Yamaha RX-V673’s advanced features to enhance your home theater experience. Utilize YPAO R.S.C. for automatic speaker calibration, ensuring optimal audio quality. Enable Dialogue Lift and Level Adjustment for clear vocals. Use the HDMI menu to set up 4K pass-through and upscaling for stunning visuals. Experiment with ECO mode to reduce power consumption without compromising sound quality. Familiarize yourself with the remote control’s shortcuts for easy navigation. Regularly update firmware via the network or USB to access new features and improvements. These tools will help you unlock the full potential of your AV receiver for a superior entertainment setup.

Customizing Settings for Different Scenarios

Customize your Yamaha RX-V673 settings to match different entertainment scenarios. For movies, enable Cinema DSP and select immersive surround sound modes. For music, adjust the audio format to stereo or pure direct for clarity. Use the Dialogue Level Adjustment for clearer vocals during TV shows or sports. Experiment with the YPAO R.S.C. calibration for optimal speaker balance. Save custom profiles for gaming, late-night listening, or parties. Navigate through the Setup menu to fine-tune these preferences, ensuring a tailored experience for every occasion. This flexibility enhances your home theater’s versatility and enjoyment.

The Yamaha RX-V673 manual is an essential guide for optimizing your AV receiver experience. It provides detailed insights, ensuring you unlock all features and enjoy enhanced audio-visual performance effortlessly.

The Yamaha RX-V673 manual highlights a robust AV receiver with 4K pass-through, upscaling, and YPAO R.S.C. calibration for precise sound optimization. It supports Wi-Fi and HDMI, enabling seamless connectivity with modern devices. The receiver features advanced audio technologies, including Dialogue Lift for clarity and ECO mode for energy efficiency. With comprehensive network capabilities and compatibility with various external devices, it ensures an enhanced home theater experience. The manual guides users through setup, troubleshooting, and customization, making it an invaluable resource for unlocking the receiver’s full potential and enjoying high-quality audio-visual performance.

Final Tips for Users

Regularly update the firmware to ensure optimal performance and access the latest features. For the best audio experience, use the YPAO R.S.C. calibration for precise speaker settings. Experiment with sound modes to tailor audio to your preference. Ensure HDMI settings are configured correctly for 4K pass-through and upscaling. Check network stability for uninterrupted streaming and AirPlay connectivity. Refer to the troubleshooting guide for common issues. Periodically review and adjust settings to maintain peak performance. Explore additional resources and Yamaha support for advanced customization and troubleshooting assistance.

Resources for Further Assistance

For additional support, visit Yamaha’s official website for downloadable manuals, troubleshooting guides, and FAQs. Explore community forums and Yamaha’s customer support for personalized assistance. Refer to the Yamaha RX-V673 manual available in PDF format for detailed instructions. Utilize online resources like setup tutorials and user-generated guides. Contact Yamaha’s customer service for technical inquiries. Stay updated with firmware notifications and software enhancements. Access the Yamaha support page for direct links to manuals, specifications, and additional documentation tailored for your AV receiver.

2006 honda accord coupe v6 manual

The 2006 Honda Accord Coupe V6 Manual combines power and precision, offering a smooth driving experience with its 6-speed manual transmission and V6 engine․ Its sleek design and sporty appeal make it a favorite among enthusiasts, while maintaining reliability and efficiency․

1․1 Overview of the Vehicle

The 2006 Honda Accord Coupe V6 Manual is a stylish and reliable vehicle, combining performance with practicality․ It features a sleek coupe design with a spacious interior, offering comfort for both drivers and passengers․ Known for its durability and low maintenance costs, this model is a popular choice for everyday driving․ With a proven track record of longevity, many owners have reported high mileage without major issues․ The V6 engine and manual transmission provide a smooth and engaging driving experience․ However, some owners have noted common issues like power window malfunctions and oil consumption over time․

1․2 Importance of the Manual Transmission

The 6-speed manual transmission in the 2006 Honda Accord Coupe V6 Manual is a key feature that enhances driver engagement and control․ It provides precise gear shifts, allowing for smooth acceleration and optimal performance․ Many enthusiasts appreciate the connection to the vehicle that a manual transmission offers, making the driving experience more enjoyable and interactive․ Additionally, manual transmissions are often associated with better fuel efficiency and lower maintenance costs compared to automatics․ This makes the 2006 Accord Coupe V6 Manual a desirable choice for both daily driving and performance-oriented enthusiasts․

Engine and Performance

The 2006 Honda Accord Coupe V6 Manual is equipped with a powerful V6 engine, delivering smooth power delivery and responsive acceleration․ The 6-speed manual transmission enhances driving dynamics, making it a joy for enthusiasts who value precision and control․

2․1 Specifications of the V6 Engine

The 2006 Honda Accord Coupe V6 Manual features a 3․0-liter V6 engine, producing 244 horsepower at 6,250 rpm and 220 lb-ft of torque at 5,000 rpm․ Known for its smooth power delivery and responsive acceleration, the engine is paired with a 6-speed manual transmission․ The V6 engine boasts a lightweight aluminum-alloy construction, contributing to both performance and fuel efficiency․ It also incorporates VTEC technology for improved efficiency at lower speeds and enhanced performance during acceleration․ This engine is reliable and durable, making it a standout feature of the Accord Coupe․

2․2 Performance Capabilities

The 2006 Honda Accord Coupe V6 Manual delivers impressive performance with its 3․0-liter V6 engine, offering smooth acceleration and responsive handling․ It accelerates from 0-60 mph in just 5․8 seconds, making it a fun-to-drive option for enthusiasts․ The 6-speed manual transmission provides precise control, allowing drivers to fully utilize the engine’s power․ With 244 horsepower and 220 lb-ft of torque, the Accord Coupe excels on both highway cruises and winding roads․ Its balanced chassis and sport-tuned suspension enhance cornering stability, while the V6 exhaust note adds a sporty flair to the driving experience․

Fuel Efficiency

The 2006 Honda Accord Coupe V6 Manual achieves respectable fuel efficiency, with an EPA rating of up to 34 miles per gallon on the highway, making it a practical choice despite its powerful V6 engine․

3․1 EPA Ratings

The 2006 Honda Accord Coupe V6 Manual boasts respectable EPA ratings, with an estimated 18 miles per gallon in the city and 26 miles per gallon on the highway․ This combines to a 21 miles per gallon overall rating, making it a balanced choice for drivers seeking both performance and efficiency․ These figures align with expectations for a V6-powered coupe, ensuring a blend of power and practicality․ The EPA ratings highlight Honda’s commitment to delivering reliable fuel efficiency without compromising on the driving experience․ This makes the Accord Coupe V6 Manual a competitive option in its class․

3․2 Real-World Fuel Economy

Real-world fuel economy for the 2006 Honda Accord Coupe V6 Manual often aligns closely with EPA estimates, though actual mileage can vary based on driving conditions and habits․ Many owners report achieving around 18-22 MPG in city driving and 24-28 MPG on the highway, depending on how the vehicle is maintained and driven․ Proper maintenance, such as regular oil changes and tire pressure checks, plays a significant role in optimizing fuel efficiency․ Factors like aggressive driving or frequent stop-and-go traffic can lower real-world mileage, while conservative driving habits may enhance it․ Overall, the Accord Coupe V6 Manual strikes a balance between performance and practicality․

Common Issues and Maintenance

The 2006 Honda Accord Coupe V6 Manual is generally reliable but may experience issues like transmission problems and engine oil consumption․ Regular maintenance is crucial․

4․1 Transmission Problems

The 2006 Honda Accord Coupe V6 Manual has reported issues with its 6-speed manual transmission, including grinding gears and slipping, particularly when shifting into lower gears․ Some owners have experienced difficulty engaging gears, especially when the engine is cold․ These problems often arise around 50,000 to 80,000 miles․ In some cases, the clutch pack or synchro rings may need replacement, which can be costly․ Honda extended the transmission warranty for some models due to these issues․ Regular transmission fluid changes and proper driving techniques can help mitigate these problems․

4․2 Engine Oil Consumption

The 2006 Honda Accord Coupe V6 Manual has been known to experience higher-than-normal engine oil consumption, particularly in vehicles with the K24A engine․ Some owners have reported using up to 1 quart of oil every 1,000 to 1,500 miles, especially in high-mileage vehicles․ This issue is often linked to worn piston rings or excessive blow-by gases escaping into the engine’s intake system․ Regular oil changes and monitoring oil levels can help manage the problem․ In severe cases, piston replacement may be necessary to resolve the issue permanently․

4․3 Power Window Issues

The 2006 Honda Accord Coupe V6 Manual has been reported to experience power window malfunctions, particularly with the passenger and rear windows stopping functionality simultaneously․ This issue often stems from faulty window motors or switches․ Replacing the problematic components typically resolves the issue, though it can be a time-consuming process․ In some cases, the master control unit may need adjustment or replacement․ Regular inspections and timely repairs are crucial to prevent further complications․ Proper maintenance, as outlined in the owner’s manual, can help mitigate these electrical concerns․

Interior and Features

The 2006 Honda Accord Coupe V6 Manual features a spacious interior with comfortable seating, premium materials, and modern amenities․ It includes power windows, mirrors, and a stereo system for enhanced convenience․

5․1 Design and Comfort

The 2006 Honda Accord Coupe V6 Manual boasts a stylish and functional interior that blends sportiness with practicality․ The cockpit-style design places controls within easy reach, while comfortable seating and ample legroom ensure a pleasant ride for all passengers․ Premium materials and ergonomic layout enhance the driving experience․ Features like power windows and mirrors add convenience, while the intuitive stereo system provides entertainment․ The spacious trunk and rear seating make it versatile for daily use, balancing performance and comfort seamlessly․

5․2 Technology and Convenience Features

The 2006 Honda Accord Coupe V6 Manual is equipped with a range of technology and convenience features that enhance the driving experience․ The stock stereo system includes an auxiliary input for connecting external music devices, while power windows and mirrors add ease to daily use․ The programmable remote entry system offers added convenience․ Additionally, features like cruise control and a maintenanceminder system help keep the car running smoothly․ These amenities make the Accord a reliable and user-friendly choice for drivers seeking both performance and practicality․

Manual Transmission Experience

The 2006 Honda Accord Coupe V6 Manual delivers a smooth and precise shifting experience, offering full control over the V6 engine’s power․ Its sporty feel and engaging drive make it a driver’s delight․

6․1 Driving Dynamics

The 2006 Honda Accord Coupe V6 Manual offers exceptional driving dynamics, combining smooth acceleration with precise control․ The 6-speed manual transmission provides crisp shifts, allowing drivers to fully engage with the V6 engine’s power delivery․ Its responsive handling and balanced chassis make it both a joy on twisty roads and a comfortable cruiser on highways․ The manual gearbox enhances the driving experience, giving a direct connection to the vehicle, while the engine’s torque ensures smooth transitions between gears․ This setup caters to enthusiasts seeking a fun and engaging drive․

6․2 Advantages of the 6-Speed Manual

The 6-speed manual transmission in the 2006 Honda Accord Coupe V6 offers numerous advantages․ It provides driver engagement and control, making every drive more enjoyable․ The manual gearbox allows for better fuel efficiency in real-world driving conditions compared to automatics․ It also enhances performance, enabling drivers to maximize the V6 engine’s power and torque delivery․ Additionally, the manual transmission is more durable and requires less maintenance over time․ This makes it a preferred choice for enthusiasts and cost-conscious owners alike, ensuring a superior driving experience․

Stereo System and Upgrades

The 2006 Honda Accord Coupe V6 Manual features a standard stereo system with an auxiliary input for added convenience․ Aftermarket upgrades are popular for enhancing sound quality and adding modern features like Bluetooth and USB connectivity․

7․1 Stock Stereo Overview

The 2006 Honda Accord Coupe V6 Manual comes equipped with a standard stereo system designed for reliable performance and basic connectivity․ The system includes an AM/FM radio, a CD player, and an auxiliary input for connecting external devices․ The auxiliary connection is conveniently located at the bottom of the stereo unit, accessible through a storage compartment․ While the stock system provides decent sound quality, it lacks modern features like Bluetooth or USB connectivity, making it a candidate for upgrades․ This setup balances functionality and simplicity, catering to drivers who prefer a no-frills audio experience while leaving room for customization․

7․2 Aftermarket Upgrade Options

For enhanced audio quality and modern features, aftermarket upgrades are a popular choice for the 2006 Honda Accord Coupe V6 Manual․ Owners can replace the stock head unit with a modern touchscreen infotainment system, adding Bluetooth connectivity, USB ports, and smartphone integration․ Upgrading the speakers with high-quality aftermarket components improves sound clarity and bass response․ Additionally, installing an amplifier or subwoofer can significantly enhance the audio experience․ Crutchfield’s Research Garage article provides detailed guidance on compatible upgrades and installation tips, ensuring a seamless transition to a more advanced audio system․

Maintenance and Longevity

Regular maintenance is crucial for the 2006 Honda Accord Coupe V6 Manual․ Oil changes, timing belt replacements, and monitoring engine oil consumption ensure longevity․ Proper care extends its lifespan․

8․1 Importance of Regular Maintenance

Regular maintenance is essential for the 2006 Honda Accord Coupe V6 Manual to ensure optimal performance and longevity․ Routine tasks like oil changes, timing belt inspections, and fluid checks prevent costly repairs․ Addressing issues early, such as excessive oil consumption or transmission problems, can extend the vehicle’s lifespan․ Following the factory-recommended maintenance schedule helps maintain reliability and fuel efficiency․ Proper care also preserves the integrity of the V6 engine and manual transmission, ensuring a smooth driving experience․ By staying proactive, owners can avoid major breakdowns and keep their Accord running like new for years to come․

8․2 Expected Lifespan and Reliability

The 2006 Honda Accord Coupe V6 Manual is renowned for its durability and reliability, often lasting well beyond 200,000 miles with proper care․ The V6 engine is robust, though some owners report higher oil consumption over time․ Regular maintenance, such as timing belt replacements and oil changes, is crucial to extending its lifespan․ Many owners have reported low maintenance costs and minimal mechanical issues when adhering to Honda’s service schedule․ With its reliable transmission and well-engineered design, this Accord model remains a dependable choice for long-term ownership, making it a favorite among drivers who value consistency and performance․

Value and Resale

The 2006 Honda Accord Coupe V6 Manual holds a strong resale value due to its durability and performance, appealing to driving enthusiasts and retaining competitiveness in its class․

9․1 Resale Value

The 2006 Honda Accord Coupe V6 Manual enjoys a strong resale value due to its reliability and performance․ Its V6 engine and 6-speed manual transmission appeal to driving enthusiasts, while Honda’s reputation for durability ensures long-term satisfaction․ Owners report high mileage vehicles retaining significant value when properly maintained․ The coupe’s sporty design and efficient fuel economy further enhance its appeal․ However, common issues like transmission problems and engine oil consumption can impact resale value if not addressed․ Regular maintenance and a clean history maximize its resale potential, making it a smart investment for car buyers․

9․2 Cost of Ownership

The 2006 Honda Accord Coupe V6 Manual offers a balanced cost of ownership, combining reliable performance with moderate expenses․ While its V6 engine provides strong performance, it may incur higher fuel costs compared to smaller engines․ Maintenance expenses are generally low, but issues like transmission problems and engine oil consumption can increase costs if left unaddressed․ Insurance rates are competitive for its class, and the vehicle’s durable build helps reduce long-term repair expenses․ Overall, it remains a cost-effective choice for drivers seeking a blend of power and practicality․

Owner and Service Manuals

The owner’s manual provides essential guidance for operating and maintaining the vehicle, while the service manual offers detailed repair instructions, both crucial for long-term upkeep and resale value․

10․1 Importance of the Owner’s Manual

The owner’s manual is a vital resource for understanding and maintaining the 2006 Honda Accord Coupe V6 Manual․ It provides detailed instructions for operating the vehicle, including controls, features, and safety guidelines․ Regularly referencing the manual ensures proper maintenance, helping to prevent issues and extend the car’s lifespan․ It also includes troubleshooting tips for common problems, empowering owners to address minor issues independently․ Additionally, the manual serves as a valuable reference for resale, proving the car has been well-maintained․ Always keep it with the vehicle to preserve its value and functionality over time․

10․2 Accessing the Factory Service Manual

The factory service manual for the 2006 Honda Accord Coupe V6 Manual is an essential resource for detailed repairs and advanced diagnostics․ It can be accessed through Honda’s official website or authorized dealerships․ Additionally, third-party websites and forums often provide downloadable versions, though caution is advised to ensure authenticity․ Some owners have reported difficulty finding manuals specific to their model year, but persistent searching on trusted platforms can yield results; The manual is typically available in DVD or digital formats, making it convenient for reference․ Always verify the source to avoid unauthorized or inaccurate versions․

troy bilt power washer owners manual

Welcome to the Troy-Bilt Power Washer Owner’s Manual! This guide provides essential information for safe operation, maintenance, and troubleshooting to ensure optimal performance and longevity of your pressure washer.

1.1 Overview of the Troy-Bilt Power Washer

The Troy-Bilt Power Washer is a versatile and durable cleaning solution designed for various tasks, from light home use to heavy-duty projects. Available in models like the 3000 PSI or 2800 PSI, it offers powerful performance with adjustable pressure settings. Equipped with a reliable engine and high-pressure hose, it ensures efficient cleaning of surfaces such as decks, driveways, and siding. The washer also includes multiple nozzle tips for different cleaning needs and is built with durable components for long-lasting use. This manual will guide you through its features, operation, and maintenance to help you get the most out of your Troy-Bilt Power Washer.

1.2 Importance of the Owner’s Manual

The owner’s manual is crucial for understanding your Troy-Bilt Power Washer’s operation, maintenance, and troubleshooting. It contains detailed safety guidelines, usage instructions, and technical specifications to ensure safe and effective operation. By following the manual, you can prevent hazards, extend the product’s lifespan, and maintain its performance. The manual also provides warranty information and customer support contacts, ensuring you have all the resources needed for any assistance. Reading and adhering to the manual will help you maximize the benefits of your Troy-Bilt Power Washer while minimizing risks and maintenance costs. Always refer to it before using your pressure washer for the first time and whenever you encounter issues.

1.3 Safety Information and Warnings

The Troy-Bilt Power Washer Owner’s Manual emphasizes critical safety information to prevent accidents and ensure safe operation. It highlights potential hazards, such as high-pressure jets and chemical risks, and provides guidelines to avoid injuries. Users are advised to wear protective gear, including gloves and eyewear, and to keep children away during operation. The manual also warns against using the washer near open flames or sparks and stresses the importance of proper chemical handling. Failure to follow safety guidelines can result in serious injury or damage. Always read and adhere to the safety warnings before using your Troy-Bilt Power Washer to ensure a safe and effective cleaning experience.

Safety Precautions

Always wear protective gear, avoid direct spraying of people or pets, and ensure proper ventilation when using chemicals. Keep children away and follow all warnings carefully.

2.1 General Safety Warnings

Always read and follow the safety instructions in this manual to minimize risks. Wear protective eyewear, gloves, and closed-toe shoes when operating the pressure washer. Keep children and pets away from the area. Never aim the spray nozzle at people, animals, or windows. Avoid using the pressure washer in enclosed spaces without proper ventilation. Be cautious of slippery surfaces and ensure the area is clear of obstacles. High-pressure spray can cause serious injury, so maintain a safe distance from the nozzle. Never modify the equipment or use it for purposes other than its intended use. Follow all warnings and guidelines to ensure safe operation.

2.2 Proper Attire and Protective Gear

Wearing proper attire and protective gear is crucial when operating the Troy-Bilt pressure washer. Always wear safety glasses or goggles to protect your eyes from debris and high-pressure spray. Use gloves to maintain a firm grip and prevent slipping. Closed-toe shoes or boots are essential to protect your feet from potential hazards. Avoid loose clothing or jewelry that could get caught in moving parts. Long pants and a long-sleeved shirt can help prevent skin irritation from spray. Ensure all clothing is secure and tied back if necessary. Hearing protection, such as earplugs, is recommended if operating the pressure washer in noisy environments. Proper attire enhances safety and comfort during use.

2.3 Handling Chemicals and Detergents Safely

When using chemicals or detergents with your Troy-Bilt pressure washer, always follow safety guidelines to avoid accidents. Wear protective gloves and eyewear to prevent skin and eye irritation. Avoid using bleach or abrasive chemicals, as they can damage surfaces or harm the environment. Only use detergents specifically designed for pressure washers, as they are safer for surfaces and the washer itself. Always dilute chemicals according to the manufacturer’s instructions to prevent over-concentration. Keep chemicals away from children and pets. Dispose of leftover detergents and cleaning solutions responsibly, adhering to local environmental regulations. Proper handling ensures safety for both you and the environment.

Assembly and Setup

Begin by carefully unpacking and inventorying all parts. Use the provided tools to assemble the unit, following step-by-step instructions. Attach hoses and accessories securely, ensuring proper connections. Review safety guidelines before first use to ensure everything is set up correctly.

3.1 Unpacking and Inventory of Parts

When you receive your Troy-Bilt power washer, carefully unpack all components and verify each part against the inventory list provided in the manual. Ensure no items are damaged or missing. This step is crucial to avoid delays in assembly. Pay special attention to smaller components like bolts, hoses, and accessories. If any part is missing or damaged, contact Troy-Bilt customer support immediately. Properly organizing the parts will make the assembly process smoother and more efficient. Refer to the manual for a detailed list and descriptions of each component.

3.2 Tool Requirements for Assembly

Assembling your Troy-Bilt power washer requires specific tools to ensure a smooth and safe setup. Gather a socket wrench, adjustable wrench, screwdrivers (both Phillips and flathead), and a torque wrench for securing bolts properly. Ensure all tools are in good condition to avoid stripping screws or damaging parts. Refer to the manual for a detailed list of required tools. Having a clean, flat workspace will also aid in organizing components efficiently. If any specialized tools are needed, they are typically included in the packaging or specified in the manual. Proper tools will help prevent assembly errors and ensure your pressure washer is ready for use.

3.3 Attaching Hoses and Accessories

Attaching hoses and accessories to your Troy-Bilt power washer is a critical step for proper functionality. Begin by aligning the couplers on the hoses with the corresponding ports on the machine. Secure them tightly using the provided pins or clips to ensure a leak-free connection. Next, attach the high-pressure hose to the pump and spray gun, making sure all fittings are tightened firmly. For additional accessories, such as detergent injectors or spray tips, follow the manufacturer’s guidelines for installation. Always double-check connections for leaks before use. Properly attached hoses and accessories ensure safe and efficient operation of your pressure washer. Refer to the manual for specific instructions on each component.

Operating Instructions

Follow the manual for starting the engine, using nozzles, adjusting pressure, and selecting detergent. Ensure all components are secure before operation for safety and efficiency.

4.1 Starting the Engine

Starting the engine of your Troy-Bilt pressure washer requires careful steps to ensure safety and proper function. Begin by moving the choke lever to the “start” position and pulling the recoil handle gently until resistance is felt. Next, squeeze the throttle trigger and pull the recoil handle firmly to engage the engine. Once the engine starts, allow it to warm up for a few seconds before adjusting the throttle to your desired setting. Always ensure the area is clear of debris and flammable materials. Refer to your specific model’s manual, such as the Troy-Bilt 020676 or 2800 PSI models, for detailed instructions.

4.2 Using Different Nozzle Tips

Your Troy-Bilt pressure washer comes with interchangeable nozzle tips designed for various cleaning tasks. The standard tips include a wide fan tip for general cleaning, a narrow tip for intense pressure, and a low-pressure tip for delicate surfaces. To change the nozzle, pull it straight off and insert the desired tip until it clicks securely. Always use the correct tip for your task to avoid damage or inefficient cleaning. For specific models like the Troy-Bilt 020676 or 2800 PSI, refer to the manual for tip compatibility and usage guidelines to ensure optimal performance and safety.

4.3 Adjusting Pressure Settings

Adjusting the pressure settings on your Troy-Bilt power washer is essential for optimizing cleaning performance. The pressure control knob is typically located near the engine or pump. Turn the knob clockwise to increase pressure and counterclockwise to decrease it. Always start with a lower setting for delicate surfaces and gradually increase as needed. For models like the Troy-Bilt 2800 PSI, ensure the detergent injector is turned off when using high-pressure settings to prevent damage.

Refer to your owner’s manual for specific instructions, as settings may vary by model. Proper adjustment ensures efficiency and prevents damage to surfaces or the washer itself.

4.4 Selecting the Right Detergent

Selecting the appropriate detergent for your Troy-Bilt power washer is crucial for effective cleaning and maintaining the equipment. Always use detergents specifically designed for pressure washers, as household cleaners can damage the system or harm the environment. For most models, such as the Troy-Bilt 2800 PSI, a low-suds, biodegradable detergent is recommended. Avoid using bleach, ammonia, or abrasive chemicals, as they can corrode components or void the warranty. Refer to your owner’s manual for specific recommendations, as some models may require specialized detergents. Ensure the detergent is diluted according to the manufacturer’s instructions for optimal performance and longevity of your washer.

Maintenance and Upkeep

Regular maintenance ensures your Troy-Bilt power washer operates efficiently and lasts longer. Clean the unit, check for worn parts, and store it properly to maintain performance and reliability.

5.1 Importance of Regular Maintenance

Regular maintenance is crucial for extending the life and performance of your Troy-Bilt power washer. Proper upkeep ensures optimal functionality, prevents wear and tear, and avoids costly repairs. By following the manual’s guidelines, you can identify and address potential issues early, such as clogged nozzles or worn seals. Routine checks also ensure safety, as neglected machines may pose hazards. Over time, neglecting maintenance can lead to reduced pressure output, inefficient cleaning, and even complete system failure. Consistent care, including winterizing and storing the unit correctly, guarantees your pressure washer remains reliable for years of dependable service.

5.2 Checking and Replacing Parts

Regularly inspecting and replacing worn or damaged parts is essential for maintaining your Troy-Bilt power washer’s performance. Check hoses for cracks, nozzles for blockages, and O-rings for wear. Replace these components as needed to prevent leaks and maintain pressure. Refer to your owner’s manual for a list of common service parts and instructions for replacement. Always use genuine Troy-Bilt parts to ensure compatibility and reliability. For convenience, replacement parts can be purchased from authorized dealers or the Troy-Bilt website. Regular checks and timely replacements will help extend the lifespan of your pressure washer and ensure it operates efficiently for years to come.

5.3 Winterizing Your Pressure Washer

Winterizing your Troy-Bilt pressure washer is crucial to protect it from freezing temperatures and ensure it remains functional for years. Start by draining all fuel from the tank and running the engine until it stops to clear residual fuel. Next, disconnect and drain the hoses, then clear water from the pump and wand. Use a pump saver or antifreeze solution if recommended in your manual. Store the unit in a dry, frost-free area, away from direct sunlight. Protect the engine and electrical components from moisture. Finally, check the manual for specific winterizing steps tailored to your model to ensure proper preparation for the off-season.

5.4 Storage Tips

Proper storage is essential to maintain your Troy-Bilt pressure washer’s performance and longevity. After winterizing, store the unit in a clean, dry, and well-ventilated area, away from direct sunlight and moisture. Ensure the storage location is out of reach of children and pets. Cover the pressure washer with a durable, breathable cover to protect it from dust and debris. Avoid storing it in extreme temperatures or humid environments. Before storing, inspect the unit for any damage or wear and address issues promptly. Always refer to your owner’s manual for specific storage recommendations tailored to your model. Proper storage ensures your pressure washer remains ready for use when needed.

Troubleshooting Common Issues

This section addresses common problems like low pressure, engine issues, leaks, and unusual noises. Follow the guide to diagnose and resolve issues effectively, ensuring optimal performance.

6.1 Low Pressure or No Water Flow

Low pressure or no water flow in your Troy-Bilt power washer can be caused by a clogged nozzle, blocked hose, or incorrect detergent usage. Check for kinks or debris in the hose and ensure the water supply is adequate. Inspect the nozzle for mineral buildup and clean it with a soft brush or replace it if damaged. Verify that the detergent used is compatible with your model. If issues persist, check the pump for damage or wear and refer to the manual for replacement instructions. Regular maintenance and proper setup are key to resolving these issues effectively.

6.2 Engine Not Starting

If your Troy-Bilt power washer’s engine fails to start, check the fuel level and quality. Ensure the fuel is fresh and correctly mixed if applicable. Inspect the spark plug for cleanliness or damage and replace it if necessary. Verify that the choke is properly adjusted and not clogged. Check the oil level and ensure it meets the recommended specifications. If the engine still doesn’t start, consult the troubleshooting section in your manual or contact Troy-Bilt customer support for assistance. Regular maintenance, such as cleaning the air filter and ensuring proper fuel flow, can prevent such issues.

6.3 Leaks in the System

If you notice leaks in your Troy-Bilt power washer, inspect the high-pressure hoses, connections, and seals for damage or wear. Tighten any loose fittings and replace worn-out O-rings or gaskets. Check the pump and detergent tank for cracks or damage. Ensure all connections are secure and aligned properly. If leaks persist, refer to the manual for specific replacement instructions or contact Troy-Bilt customer support for assistance. Regularly inspecting and maintaining these components can help prevent leaks and maintain optimal performance.

6.4 Strange Noises

If your Troy-Bilt power washer emits unusual noises, such as grinding, screeching, or rattling, it may indicate worn or loose components. Check for loose belts, damaged pulleys, or debris in the pump. Inspect the high-pressure hose for kinks or blockages, which can cause vibration and noise. Lubricate moving parts if necessary. If the noise persists, refer to the manual for troubleshooting steps or contact Troy-Bilt customer support. Addressing the issue promptly can prevent further damage and ensure smooth operation.

Parts and Accessories

Your Troy-Bilt power washer requires genuine parts and accessories for optimal performance. Visit authorized dealers or the official website to purchase replacement parts and compatible add-ons.

7.1 Common Replacement Parts

Your Troy-Bilt power washer may require replacement parts over time. Common items include hoses, nozzles, belts, and pump components; Always use genuine Troy-Bilt parts for optimal performance.

These parts are readily available through authorized dealers or the official Troy-Bilt website. Ensure compatibility by matching your model and serial number when ordering replacements.

Regularly inspecting and replacing worn-out parts will extend the life of your pressure washer and maintain its efficiency. Refer to your owner’s manual for a detailed list of common service parts.

7.2 Recommended Accessories

To enhance your Troy-Bilt power washer’s functionality, consider these recommended accessories: high-pressure hoses, assorted nozzle tips, and detergent injectors. These improve cleaning efficiency and versatility for various tasks.

  • Pressure Hoses: Extend reach and durability for heavy-duty use.
  • Nozzle Tips: Tailor spray patterns for different surfaces and cleaning needs.
  • Detergent Injectors: Optimize cleaning power with specialized detergents.
  • Brush Attachments: Scrub tough areas like concrete or siding.
  • Storage Kits: Keep accessories organized and protected.

These accessories are available on the Troy-Bilt website or through authorized dealers, ensuring compatibility and performance.

7.3 Where to Purchase Parts

To ensure compatibility and quality, purchase genuine Troy-Bilt parts directly from authorized dealers or the official Troy-Bilt website. For convenience, visit www.troybilt.com and use the “Parts & Accessories” section. You can also contact Troy-Bilt Customer Service at (888) 611-6708 for assistance in locating specific parts or finding nearby retailers. Authorized dealers and home improvement stores like Home Depot or Lowe’s typically carry Troy-Bilt parts. Always verify the model and serial number before making a purchase to ensure the correct fit for your pressure washer.

  • Official Website: Direct source for genuine parts.
  • Authorized Dealers: Local retailers with certified products.
  • Customer Support: Call (888) 611-6708 for guidance.

Warranty and Customer Support

Your Troy-Bilt power washer is backed by a comprehensive warranty. For inquiries or assistance, contact Customer Support at (888) 611-6708 or visit www.troybilt.com.

8.1 Understanding Your Warranty

Your Troy-Bilt power washer is protected by a comprehensive warranty designed to ensure years of reliable performance. The warranty covers defects in materials and workmanship for a specified period, typically starting from the date of purchase. It is essential to review your warranty document to understand the terms, including what is covered and any exclusions. Proper registration of your product and adherence to maintenance guidelines can help maintain warranty validity. For detailed information, refer to your owner’s manual or contact Troy-Bilt customer support. Understanding your warranty ensures you can address any issues promptly and enjoy uninterrupted use of your pressure washer.

8.2 Contacting Customer Service

For assistance with your Troy-Bilt power washer, contact customer service at 888-611-6708, available Monday through Friday from 8 AM to 5 PM CST. Visit their official website at www.troybilt.com for online support, including troubleshooting guides, manuals, and FAQs. You can also submit inquiries or feedback through the website. Representatives are trained to help with product questions, warranty claims, and technical support. Ensure you have your model and serial number ready for efficient service. This resource is designed to provide quick solutions and enhance your overall product experience, ensuring your Troy-Bilt power washer operates at its best.

8.3 Online Resources and Manuals

Troy-Bilt provides comprehensive online resources to support your power washer experience. Visit their official website at www.troybilt.com to access free downloadable manuals, troubleshooting guides, and FAQs. Manuals for specific models, such as the Troy-Bilt 3000 PSI pressure washer, can also be found on platforms like ManualsLib. Additionally, online resources include detailed repair guides, warranty information, and instructional videos. For further assistance, you can contact customer service directly or refer to the operator’s manual specific to your model. These resources ensure you have everything needed to maintain and operate your Troy-Bilt power washer effectively.

Environmental Impact

Using your Troy-Bilt power washer responsibly helps minimize environmental impact. Follow eco-friendly tips, dispose of waste properly, and use energy-efficient settings to reduce ecological footprint.

9.1 Eco-Friendly Usage Tips

To minimize environmental impact, use your Troy-Bilt power washer responsibly. Always use biodegradable detergents and avoid excessive water usage by adjusting pressure settings. Regularly maintain your washer to ensure efficiency and reduce energy consumption. Avoid cleaning hard surfaces unnecessarily and opt for low-pressure settings when possible. Properly dispose of cleaning solutions and wash water to prevent contamination of water sources. By following these eco-friendly tips, you can reduce your environmental footprint while maintaining cleaning effectiveness.

  • Use eco-friendly detergents to avoid harming the environment.
  • Adjust pressure settings to conserve water and energy.
  • Regular maintenance ensures optimal efficiency and reduces waste.

9.2 Proper Disposal of Waste

Proper disposal of waste is crucial for environmental protection. Always follow local regulations for disposing of cleaning solutions, oils, and other hazardous materials. Recycle metal and plastic parts when possible. Check with local facilities for guidelines on disposing of batteries, filters, and chemical detergents. Never drain wash water or cleaning agents into storm drains, as they can harm aquatic life. Ensure all waste materials are handled responsibly to minimize environmental impact.

  • Recycle metal and plastic components when replacing parts.
  • Dispose of hazardous materials like batteries and chemicals safely.
  • Prevent contamination by keeping waste away from water sources.

9;3 Energy Efficiency

Maximizing energy efficiency is key to reducing environmental impact. Troy-Bilt power washers are designed with eco-friendly features to minimize energy consumption. Use the recommended pressure settings and detergent amounts to optimize performance while lowering energy use. Regular maintenance ensures the unit operates efficiently, reducing fuel or electricity consumption. Consider using eco-mode settings if available to further conserve energy. By following these practices, you contribute to energy conservation and environmental protection.

  • Use correct pressure settings for tasks to avoid excess energy use.
  • Maintain the washer regularly for optimal efficiency.
  • Utilize eco-mode settings when available.

10.1 Summary of Key Points

10.2 Final Tips for Optimal Use

For optimal use of your Troy-Bilt Power Washer, always follow the recommended maintenance schedule and safety guidelines. Regularly inspect hoses and connections to prevent leaks, and store the unit in a dry, protected area during off-seasons. Use the correct nozzle tips and detergents for specific tasks to avoid damage and ensure efficiency. Properly winterize the washer to prevent freezing and extend its lifespan. By adhering to these tips, you can enjoy consistent performance and reliability from your Troy-Bilt Power Washer for years to come.

concord 4 user manual

Welcome to the Concord 4 User Manual, your comprehensive guide to understanding and operating the Concord 4 Security System․ This manual provides detailed instructions for installation, programming, and daily operations․

Designed to enhance security and convenience, the Concord 4 offers advanced features and a user-friendly interface․ This manual ensures you maximize its potential for a secure and efficient experience․

Whether you’re installing, configuring, or maintaining the system, this manual serves as your primary resource․ It covers everything from basic setup to advanced customization, ensuring optimal performance and reliability․

1․1 Overview of the Concord 4 Security System

The Concord 4 Security System is a comprehensive, user-friendly solution designed to protect your property․ It features advanced security protocols, customizable settings, and seamless integration with various devices․ The system includes status beeps, touchpad commands, and emergency functions like manual fire alarms and smoke detector resets․ FCC-compliant and adaptable to different security needs, the Concord 4 ensures reliable protection․ This overview provides a foundation for understanding its capabilities and operation, as detailed in subsequent sections of this manual․

1․2 Key Features of the Concord 4

The Concord 4 boasts advanced security features, including customizable user codes, multiple access levels, and real-time status updates․ It supports various touchpad types, such as the SuperBus 2000 2×16 and 2×20 LCD models, ensuring flexibility․ The system also includes panic buttons for emergencies and integrates with smoke detectors for fire safety․ Its user-friendly interface and compatibility with additional security devices make it a robust solution for modern security needs․ These features ensure enhanced protection and convenience for users․

1․3 Importance of the User Manual

The Concord 4 User Manual is essential for understanding system operations, from installation to advanced features; It provides step-by-step guidance for programming user codes, configuring settings, and troubleshooting issues․ The manual also details safety procedures, such as manually initiating fire alarms and resetting smoke detectors․ By following this guide, users can ensure proper system functionality, maximize security, and handle emergencies effectively․ Regular reference to the manual guarantees optimal performance and user confidence in operating the system․

System Installation and Setup

Proper installation is crucial for the Concord 4 system․ Ensure hardware is installed according to specifications, and software is configured correctly for optimal performance and security․

2․1 Hardware Installation Requirements

Ensure the Concord 4 system is installed with compatible hardware, including touchpads, sensors, and power supplies․ Verify all components are GE-approved for optimal performance and security․

Use screws, wires, and mounting brackets provided in the kit․ Tools like screwdrivers and wire strippers are essential․ Ensure proper grounding to prevent electrical interference․

Check compatibility with existing systems to avoid conflicts․ Follow the manual’s wiring diagrams for accurate connections․ Power supply must meet specified voltage requirements․

Refer to the manual for detailed hardware specifications and installation steps to ensure a secure and reliable setup․

2․2 Initial System Configuration

After hardware installation, access the programming menu using the master code․ Navigate to system settings to set the date, time, and basic configuration options․

Ensure all zones are correctly assigned and sensors are calibrated․ Test all inputs and outputs to confirm proper functionality․

Save your configurations and exit the programming mode․ Perform a system test to verify all components are operational and settings are correctly applied․

Refer to the manual for detailed steps and troubleshooting tips to ensure a smooth initial setup and optimal system performance․

2․3 Touchpad Types and Compatibility

The Concord 4 supports various touchpad types, including the SuperBus 2000 2×16 LCD and 2×20 LCD models․ These touchpads are designed for both installer and user-friendly operation, ensuring compatibility with the system’s advanced features․

Compatibility with additional security devices, such as wireless sensors and remote access tools, enhances system functionality․ Always use touchpads approved by UTC Fire & Security for optimal performance and reliability․

Refer to the manual for detailed specifications and installation guidelines for each touchpad type to ensure seamless integration with your Concord 4 system․

Programming User Codes

Programming user codes in the Concord 4 involves accessing the system’s menu with a master code, enabling you to create, edit, or delete user codes efficiently․

3․1 Creating and Managing User Codes

Creating and managing user codes on the Concord 4 involves accessing the system’s programming menu using the master code․ Enter the menu by pressing 9 followed by the master code․ To create a new user code, press 030 followed by the desired code․ Managing codes includes editing or deleting existing ones, ensuring only authorized users have access․ Assigning access levels allows you to control user permissions, enhancing system security․ Regularly review and update user codes to maintain system integrity and organization․

3․2 Assigning Access Levels to Users

Assigning access levels to users on the Concord 4 system is essential for maintaining security and functionality․ Access levels determine the permissions and restrictions for each user, ensuring that only authorized individuals can perform specific actions․ To assign an access level, navigate to the programming menu using the master code, select the user code, and choose the appropriate level from the available options․ The system allows for flexibility, with options ranging from basic access to full system control․ Regularly review and update access levels to align with changing user roles and responsibilities, ensuring optimal security and efficiency․

Operating the Concord 4 System

The Concord 4 system operates through a user-friendly touchpad interface, enabling easy arming, disarming, and monitoring of security status․ Status beeps provide real-time system updates․

4․1 Basic Touchpad Operating Commands

The Concord 4 touchpad is central to system operation, offering intuitive controls for arming, disarming, and monitoring․ Basic commands include entering user codes, toggling zones, and checking system status․

Key functions include pressing [*] to exit menus, [1] for system status, and [2] to bypass zones․ Status LEDs and beeps provide feedback, ensuring clear communication․ Refer to the manual for detailed command sequences and troubleshooting tips․

4․2 System Testing and Verification

Regular testing is essential to ensure the Concord 4 operates flawlessly․ Begin by triggering each zone to verify sensors and alarms function correctly․ Check status beeps and lights for confirmation․

Test panic buttons and emergency functions to ensure proper alarm initiation․ Review system logs for any errors or anomalies․ Addressing issues promptly ensures reliable security and minimizes downtime․ Detailed testing procedures are outlined in the manual for a thorough verification process․ This step ensures all components integrate seamlessly, providing robust security coverage․ Regular checks maintain system integrity and user confidence․

Monitoring and Maintenance

Regular monitoring and maintenance are crucial for optimal Concord 4 performance․ Check status beeps, alarms, and system logs to identify potential issues early․ Schedule routine inspections and updates to ensure reliability and security, maintaining your system’s effectiveness over time․

5․1 Understanding Status Beeps and Alarms

The Concord 4 system uses status beeps and alarms to communicate system conditions․ Beeps indicate low battery, keypad errors, or system arming/disarming, while alarms signal breaches or emergencies․ Familiarize yourself with the sequences and tones to quickly identify issues․ Refer to Appendix A for a detailed list of sounds and their meanings․ Promptly addressing these alerts ensures system reliability and your safety․ Regular checks and timely responses are essential for maintaining security․

5․2 Regular System Maintenance Tips

Regular maintenance ensures the Concord 4 system operates efficiently․ Check keypad batteries every 6 months and replace them as needed․ Clean touchpad surfaces to prevent dirt buildup․ Test all sensors monthly to ensure proper functionality․ Verify smoke detectors are free from dust and debris․ Update system software periodically for optimal performance․ Schedule professional inspections annually to address potential issues early․ Addressing these tasks helps maintain reliability and prolongs system lifespan, ensuring your security remains uninterrupted․ Consistent upkeep is crucial for maximizing system effectiveness․

Troubleshooting Common Issues

Common issues include error beeps and user code problems․ Refer to the manual for solutions or contact support for assistance․ Regular system checks help prevent malfunctions․

6․1 Resolving User Code Errors

Common user code errors include invalid codes or code conflicts․ To resolve these, enter the programming menu using the master code․ Navigate to the user codes section and verify or reprogram codes as needed․ Ensure codes are unique and within the allowed range․ If issues persist, reset the system or consult the Concord 4 User Manual for detailed troubleshooting steps․ Always test codes after changes to confirm functionality․ Contact support if problems remain unresolved․

6․2 Addressing System Malfunctions

If the Concord 4 system malfunctions, start by checking status beeps and LED indicators for error codes․ Power-cycle the system by disconnecting and reconnecting the power source․ Verify all connections and ensure proper installation․ Clear error codes by entering the master code and following on-screen instructions․ If issues persist, refer to the troubleshooting section in the manual or contact a certified technician for assistance․ Regular maintenance and updates can prevent recurring malfunctions and ensure system reliability․

Advanced Features and Customization

The Concord 4 offers customizable settings to tailor security preferences, enhancing system functionality and user convenience․ Explore advanced features like integration with additional devices for enhanced protection and control․

7․1 Customizing System Settings

Customizing system settings on the Concord 4 allows users to tailor security preferences for enhanced functionality․ Through the touchpad, you can adjust settings such as alarm sensitivity, user access levels, and notification preferences․ Advanced options enable integration with additional security devices, ensuring a personalized and robust security solution․ Refer to the manual for detailed instructions on navigating and configuring these settings to meet your specific needs effectively․ This feature ensures optimal performance and user satisfaction․

7․2 Integrating Additional Security Devices

The Concord 4 supports seamless integration with various security devices, enhancing your system’s functionality․ Installers can add smoke detectors, motion sensors, and panic buttons, ensuring comprehensive protection․ Compatibility with SuperBus 2000 touchpads simplifies the process․ For detailed integration steps, refer to the manual or contact your security provider․ This feature allows you to create a unified security network tailored to your needs, ensuring enhanced safety and convenience․ Proper integration ensures all devices function cohesively, providing reliable protection and peace of mind․ Always follow manufacturer guidelines for optimal performance․

Safety and Emergency Procedures

This section outlines essential safety and emergency procedures for the Concord 4 system․ Learn how to initiate fire alarms, reset smoke detectors, and respond to critical situations effectively․

8․1 Manually Initiating Fire Alarms

Manually initiating fire alarms on the Concord 4 system is a critical safety feature․ Press the fire emergency button on the touchpad or activate a panic button to trigger the alarm․ This action alerts occupants and emergency services, ensuring a rapid response․ For detailed steps, refer to the Concord 4 User Manual, which provides clear instructions and safety protocols to follow during emergencies․ Always test the system regularly to ensure it functions correctly when needed․

8․2 Resetting Smoke Detectors

To reset smoke detectors in the Concord 4 system, start by pressing the 1 key followed by your user code․ This action will clear wireless smoke sensors, and the keypad will confirm the reset․ For hardwired detectors, ensure the area is smoke-free before manually resetting them․ Always follow the Concord 4 User Manual guidelines to ensure proper system functionality and safety․ Regular resets help maintain accurate detection and reliable alarm responses․

The Concord 4 User Manual equips you with essential knowledge for effective system use․ Regular updates and maintenance ensure optimal performance and security․ Refer to the manual for detailed guidance and troubleshooting․

9․1 Summary of Key Takeaways

The Concord 4 User Manual provides a comprehensive guide for system operation, from installation to advanced features․ Understanding status beeps, touchpad commands, and user code management is essential for optimal use․ Regular system testing and maintenance ensure reliability, while troubleshooting sections address common issues․ By following the manual’s instructions, users can customize settings, integrate additional devices, and maintain a secure environment․ This guide empowers users to maximize the Concord 4’s capabilities for enhanced security and convenience․

9․2 Final Tips for Effective System Use

For optimal use of the Concord 4, regularly test the system and familiarize yourself with status beeps and alarms․ Keep backup codes secure and update software periodically․ Organize user codes logically and review access levels․ Ensure all users understand basic touchpad commands and emergency procedures․ Schedule routine maintenance to prevent malfunctions․ By following these tips, you can ensure the system runs smoothly, providing reliable security and peace of mind․ Proper usage enhances safety and maximizes the Concord 4’s advanced features․

ge side by side fridge manual

GE side-by-side refrigerators offer a sleek design, user-friendly interface, and advanced features like through-the-door ice and water dispensers, ensuring convenient access to chilled water and ice.

1.1 Key Features and Benefits

GE side-by-side refrigerators are designed for convenience and efficiency, offering advanced features like through-the-door ice and water dispensers, adjustable shelves, and precise temperature controls. Energy-efficient models help reduce utility bills while maintaining optimal cooling. The spacious freezer and refrigerator compartments provide ample storage for groceries. Additional benefits include easy access to fresh water and ice, minimizing trips to the kitchen sink. These refrigerators also feature a sleek design, enhancing kitchen aesthetics. With user-friendly controls and customizable storage options, GE side-by-side refrigerators cater to diverse household needs, ensuring fresh food preservation and effortless operation.

1.2 Overview of the Manual

This manual provides comprehensive guidance for installing, operating, and maintaining your GE side-by-side refrigerator. It includes step-by-step installation instructions, safety precautions, and troubleshooting tips. The manual covers features like temperature controls, shelf adjustments, and water filtration setup. It also offers maintenance advice to ensure optimal performance and longevity. By following the manual, users can maximize their appliance’s efficiency and resolve common issues quickly. The guide is designed to be user-friendly, ensuring that all aspects of the refrigerator’s operation are clearly explained for a seamless experience. Refer to it for detailed information on each feature and function.

Installation Instructions

Ensure proper installation by following the manual’s step-by-step guide, including leveling, anti-tip setup, water filtration, and door panel alignment for safe and efficient operation.

2.1 Pre-Installation Requirements

Before installing your GE side-by-side refrigerator, ensure the space meets size specifications. The area must be level, well-ventilated, and near a water supply for ice/water dispensers. Unpack carefully, inspect for damage, and prepare tools like wrenches and drills. Ensure electrical and water connections are compatible. Refer to the manual for exact measurements and clearances to avoid issues during setup.

2.2 Step-by-Step Installation Process

Place the refrigerator in its designated location, ensuring proper clearance. 2. Connect the water line to the refrigerator for ice and water features. 3. Level the appliance using adjustable legs to ensure even operation. 4. Align the doors to ensure proper sealing and functionality. 5. Install decorative panels if required. 6. Test all features, including ice and water dispensers, to confirm functionality. Refer to the manual for specific details and safety guidelines during installation.

2;3 Anti-Tip Procedure

To prevent tipping, ensure the refrigerator is properly secured. Install the anti-tip brackets provided, following the manual’s instructions. Tighten the screws firmly to the floor or wall to stabilize the appliance. Check that the refrigerator is balanced and level. This procedure is crucial for safety, especially in homes with children or pets. Always refer to the installation guide for specific anti-tip requirements. Proper execution of this step ensures the appliance remains stable and reduces the risk of accidents. Follow all safety guidelines outlined in the manual to complete this process correctly.

2.4 Household Water Filtration Setup

Setting up the household water filtration system ensures clean water and ice. Locate the water supply line and turn off the main water valve. Use a GE SmartConnect™ Refrigerator Tubing kit for proper installation. Connect the tubing to the refrigerator’s water inlet valve and the household water supply. Tighten all connections securely. Turn the water supply back on and check for leaks. Flush the system by running water through the dispenser for several minutes to remove any debris. Refer to your specific model’s manual for detailed instructions, as procedures may vary slightly. Ensure the system is correctly installed for optimal performance and water quality.

Safety Precautions and Warnings

Read all instructions before using the appliance. Follow safety guidelines to avoid injury. Keep children away from moving parts. Do not use near flammable gases. Ensure proper installation and operation to prevent hazards. Never clean glass shelves with warm water to avoid injury. Always unplug the appliance before servicing. Adhere to the safety information provided in the manual for optimal usage and risk reduction.

3.1 Important Safety Information

Read all instructions before using the appliance. Follow safety guidelines to avoid injury. Keep children away from moving parts. Do not use near flammable gases. Ensure proper installation and operation to prevent hazards. Never clean glass shelves with warm water to avoid injury. Always unplug the appliance before servicing. Adhere to the safety information provided in the manual for optimal usage and risk reduction. This appliance is designed for household use only. Use this appliance only for its intended purpose as described in this manual. Failure to comply with safety precautions may result in injury or damage. Always follow the manufacturer’s instructions.

3.2 Appliance Usage Guidelines

Always keep children away from moving parts to prevent accidents. Store only fresh, properly sealed food to maintain quality. Avoid placing hot food directly in the refrigerator; let it cool first. Clean shelves and compartments regularly to prevent odors. Use the door handles correctly to avoid damage. Never force doors open or closed, as this may cause injury or breakage. Ensure the appliance is installed on a level surface for proper operation. Refer to the user manual for specific usage instructions tailored to your model. Proper usage ensures longevity and efficiency of your GE side-by-side refrigerator.

Operating Your GE Side-by-Side Refrigerator

Mastering your GE side-by-side refrigerator’s operation ensures optimal performance and food preservation. Adjust temperature settings to maintain ideal conditions for both fresh and frozen items, and utilize compartments efficiently.

4.1 Temperature Controls

GE side-by-side refrigerators feature intuitive temperature controls, allowing you to adjust settings for both the refrigerator and freezer compartments. The factory-preset temperature is typically set to 5 for optimal cooling. Use the controls to customize settings based on your needs, ensuring food stays fresh and frozen items remain at the right consistency. Avoid setting the freezer below 0°F, as this can lead to excessive energy use. Always refer to your manual for specific guidance on adjusting temperatures and troubleshooting. Proper temperature management is key to maintaining food safety and energy efficiency.

4.2 Freezer and Refrigerator Compartments

GE side-by-side refrigerators feature separate freezer and refrigerator compartments designed for optimal food storage. The refrigerator compartment offers adjustable shelves, door storage, and humidity-controlled crisper drawers to keep produce fresh. The freezer compartment includes fixed or adjustable shelves and bins to organize frozen items efficiently. Both compartments are designed to maintain consistent temperatures, ensuring food stays fresh longer. Use the door storage for frequently accessed items, and arrange shelves to maximize space. For specific model details, refer to your user manual, as features may vary slightly between models.

4.3 Adjustable Shelves and Storage Options

GE side-by-side refrigerators are equipped with adjustable shelves and storage options to maximize space and organization. The shelves, made of durable glass, can be easily rearranged to accommodate items of various sizes. Door bins provide additional storage for bottles, jars, and snacks, keeping them within easy reach. Many models also feature humidity-controlled drawers for fresh produce and optional features like ice makers, which save space while providing convenience. These customizable storage solutions ensure that your refrigerator and freezer compartments remain tidy and functional, catering to your specific needs.

Maintenance and Troubleshooting

Regular cleaning and inspections ensure optimal performance. Check door seals for tightness and clean shelves with mild soap. Address common issues like uneven cooling promptly for efficiency.

5.1 Cleaning and Care Tips

Regular cleaning ensures your GE side-by-side refrigerator runs efficiently and maintains hygiene. Wipe down shelves and walls with mild soap and warm water, avoiding abrasive cleaners. Clean door seals with a damp cloth to prevent mold buildup. For glass shelves, use a glass cleaner and a lint-free cloth. Check and clean the drain tube periodically to prevent clogs. Avoid using harsh chemicals on exterior surfaces; instead, use a gentle appliance cleaner. For stainless steel models, use a stainless steel wipe or a mixture of equal parts water and white vinegar to maintain a sleek appearance. Clean the condenser coils annually to improve energy efficiency. Always unplug the refrigerator before deep cleaning to ensure safety.

5.2 Common Issues and Solutions

Addressing common issues with your GE side-by-side refrigerator can ensure optimal performance. If the refrigerator is not cooling, check the temperature settings and ensure doors are sealing properly. For ice maker issues, verify water supply lines are connected and not kinked. If the dispenser is not working, ensure child lock is off and clean the dispenser area. Strange noises may indicate misaligned shelves or loose parts; tighten any loose components. Refer to the manual for troubleshooting guides or reset procedures. If problems persist, contact GE customer support for professional assistance.

Accessing Support and Resources

GE Appliances offers comprehensive support through their official website, allowing users to easily download manuals, access FAQs, and contact customer support for assistance with their side-by-side refrigerators.

6.1 Downloading the User Manual

To download the user manual for your GE side-by-side refrigerator, visit the official GE Appliances website. Enter your appliance’s model number in the search bar to find the specific manual. Manuals are available in PDF format and include detailed installation instructions, safety guidelines, and troubleshooting tips. Additionally, you can access Quick Specs for product dimensions and features, as well as Energy Guides for energy efficiency information. For further assistance, the website also provides links to customer support and repair services. Downloading the manual ensures you have all the information needed to operate and maintain your refrigerator effectively.

6.2 Contacting GE Customer Support

For assistance with your GE side-by-side refrigerator, visit the official GE Appliances website and navigate to the “Support” section. Enter your appliance’s model number to access tailored resources; You can contact GE Customer Support directly via phone, live chat, or email for troubleshooting, repair scheduling, or general inquiries. The website also provides a “Find Your Model Number” tool to help identify your specific appliance. Additionally, registered users can access their appliance’s manuals and support history through their GE Appliances account. Representatives are available to help resolve issues and ensure your refrigerator operates optimally.