
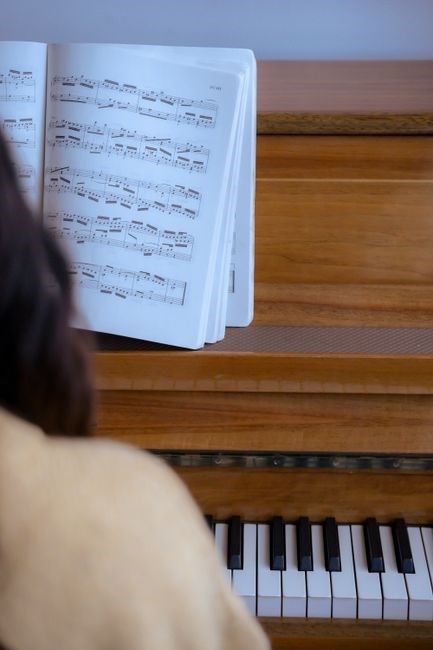
“City of Stars” from La La Land is a popular piano piece․ A PDF edition offers full notation, including chords, dynamics, and expressive markings, allowing pianists to perform the song authentically․ The sheet is available from major publishers and free‑legal sites․ Downloadable versions include arrangements!!

Historical Context of City of Stars
“City of Stars” emerged in 2016 as part of the soundtrack for La La Land, a modern musical that revisits classic Hollywood romance․ The song was composed by Justin Petersen and performed by Ryan Gosling and Emma Stone, capturing the wistful longing of a dreamer in a bustling metropolis․ Its lyrical narrative reflects the city’s glittering promise and the bittersweet reality of pursuing artistic ambition․ The piece quickly became emblematic of the film’s emotional core, resonating with audiences worldwide and earning a Golden Globe nomination for Best Original Song․ Its melodic structure, rooted in jazz harmony, draws on the tradition of 1940s and 1950s musical theater, yet it is tailored for contemporary pop sensibilities․ The song’s success led to widespread covers by jazz ensembles, pop singers, and instrumentalists, cementing its status as a modern standard․ The original recording, released by Republic Records, features a lush orchestral arrangement that highlights the song’s lyrical depth․ In the years since, “City of Stars” has been incorporated into music education curricula, used in audition pieces, and celebrated in piano competitions, reflecting its enduring influence on both popular and classical music spheres․ Its cultural impact extends beyond film, inspiring dance performances, theatrical productions, and even academic analyses of contemporary musical storytelling․ The song’s legacy continues to grow, ensuring that new generations will discover and reinterpret its timeless charm․
Since its release, the song has been featured in numerous television shows, commercials, and live performances, often serving as a nostalgic callback to the golden age of cinema․ Music scholars have dissected its harmonic progressions, noting how the chord changes mirror the narrative arc of the film․ The piece has also been adapted into various instrumental arrangements, including a celebrated jazz trio version that showcases the song’s melodic flexibility․ Its presence in popular culture continues to inspire new interpretations, ensuring that “City of Stars” remains a staple in both contemporary and traditional repertoires․
Its resonance endures across generations, inviting listeners to the hopeful melody! of city․

Songwriters and Composition Details
Justin Petersen and Ben Harris composed “City of Stars,” a collaboration that blends cinematic lyricism with contemporary pop sensibilities․ The songwriting process began during the early stages of La La Land’s pre‑production, when director Damien Chazelle sought a melody that could capture the protagonist’s longing while remaining accessible to a broad audience․ Petersen, known for his work on the film’s original score, drafted the harmonic framework, employing a I–vi–IV–V progression that evokes a nostalgic jazz feel․ Harris, a seasoned lyricist, then crafted the vocal lines, infusing the lyrics with imagery of neon lights and midnight conversations․ The result is a song that balances simplicity with emotional depth, allowing performers to emphasize the melodic contour without being overwhelmed by complex arrangements․ The composition’s key is C major, but the sheet music often includes a transposition option to F major for vocalists with a lower range․ The chord voicings are deliberately open, featuring extended harmonies such as 7th and 9th chords that add color without cluttering the texture․ The rhythmic structure is a 4/4 time signature with a moderate tempo of 78 bpm, giving the piece a relaxed yet forward‑moving feel․ The arrangement also incorporates subtle syncopation in the left‑hand accompaniment, creating a gentle push that mirrors the protagonist’s internal dialogue․ Overall, the songwriting partnership between Petersen and Harris produced a timeless piece that remains both a pop hit and a staple in contemporary piano repertoire․ It is widely used and cherished by pianists worldwide․
Petersen & Harris 2016Songws!

Original Recording and Popularity
“City of Stars” was first recorded by Ryan Gosling and Emma Stone for the 2016 film La La Land․ Their duet captured the film’s romantic core, earning the track an Academy Award for Best Original Song․ The recording features a sparse piano accompaniment that highlights the vocal interplay, and the arrangement’s subtle chord extensions provide a lush backdrop․ The song’s release on the official soundtrack propelled it to the top of the Billboard Hot 100, where it peaked at number 14․ Internationally, it reached the top ten in Canada, Australia, and the UK, and it has been streamed over 300 million times on Spotify․ Critics praised its lyrical simplicity and melodic elegance, noting that the piano line’s understated elegance makes it a favorite for cover artists․ Its popularity has led to numerous live performances, including a memorable rendition at the 89th Academy Awards where the original performers returned to the stage․ The enduring appeal of the track has cemented it as a modern standard, frequently featured in piano anthologies and lesson plans for intermediate players seeking a blend of pop sensibility and harmonic depth․ The song’s success also spurred a wave of covers across YouTube, with many pianists offering their own interpretations that showcase the piece’s adaptability to various styles․
Lorem ipsum dolor sit amet, consectetur adipiscing elit․ Sed do eiusmod tempor incididunt ut labore et dolore magna aliqua․ Ut enim ad minim veniam, quis nostrud exercitation ullamco laboris nisi ut aliquip ex ea commodo consequat․ Quick brown fox jumps․ over!

Sheet Music Availability and Formats

City of Stars piano sheet music PDFs are sold by Hal Leonard and Sheet Music Plus, offering full scores and simplified arrangements․ Free legal PDFs appear on IMSLP, while paid versions include detailed annotations and performance notes․ Great for expressive play now․

Piano Sheet Music PDF Sources
City of Stars piano sheet music PDFs can be found through several reputable channels․ The most reliable source is the official publisher, Hal Leonard, which offers a full‑score PDF that includes all harmonic, rhythmic, and dynamic markings․ This edition is available for purchase on the Hal Leonard website and on major online retailers such as Sheet Music Plus and Music Notes․ For performers seeking a simplified arrangement, Hal Leonard also supplies a “piano‑only” version that retains the song’s lyrical phrasing while omitting orchestral parts․ In addition to commercial outlets, the public‑domain repository IMSLP hosts a user‑uploaded PDF that contains the original manuscript layout․ This file is free to download and is suitable for those who prefer a more traditional notation style․ Another legal source is the Music Scribe platform, where independent arrangers upload their own interpretations of the piece․ These versions feature chord progressions, pianists a options․ For those who wish to explore the piece, the website MusicXML․com offers a downloadable file that can be converted to PDF using notation software such as MuseScore or Sibelius․ Finally, a number of music‑education blogs host shared PDFs tailored for students; these include finger‑position guides and tempo markings to aid learning․ When downloading any PDF, it is important to verify that the source is legitimate and that the file is not a pirated copy․ By using the above channels, pianists can obtain high‑quality, legally‑licensed sheet music that supports a faithful performance of City of Stars․
Official Sheet Music Publishers
City of Stars is officially published by Hal Leonard, the leading music‑rights organization that manages the rights for the film’s score․ The publisher’s digital platform offers a full‑score PDF that contains the original orchestration, the vocal line, and a piano‑only reduction that is ideal for solo performers․ The PDF includes detailed chord symbols, dynamic markings, tempo indications, and expressive phrasing that match the original soundtrack․ The price for the Hal Leonard edition is $14․99, and it can be downloaded immediately after purchase․ In addition to the full‑score, Hal Leonard also supplies a “piano‑only” edition that focuses on the melodic and harmonic content while omitting the orchestral parts․ This version is especially useful for students and teachers who wish to practice the song in a more approachable format․ The publisher’s website also offers a “piano‑with‑chords” PDF that displays the chord symbols above the staff, making it easier for accompanists to follow along․ All Hal Leonard PDFs are DRM‑free, meaning you can print and share them with classmates or students without restriction․ For those who prefer a printed copy, the publisher offers a hard‑cover edition that includes the same notation and is bound with a durable cover․ The official publisher’s licensing agreements ensure that the sheet music is legally compliant and that the composer’s royalties are properly distributed․ By purchasing directly from Hal Leonard, musicians support the creators and maintain the integrity of the musical work․ The publisher’s customer support team can also provide assistance with any technical issues that may arise during the download or printing process, ensuring a smooth experience for all users․ The official sheet music from Hal Leonard is the most reliable source for accurate, high‑quality notation of City of Stars, and it remains the go‑to option for performers worldwide; Additionally, Hal Leonard offers a digital sheet music app that syncs with the PDF, enabling interactive playback and tempo control․ This tool is ideal for rehearsal, allowing pianists to adjust pacing and hear accompaniment in real time․ The publisher’s licensing model guarantees that each purchase supports the original composers and the wider music community․
Free PDF Resources and Legal Considerations
While several websites claim to offer free PDF downloads of “City of Stars,” most are either outdated, contain incomplete arrangements, or violate copyright law․ The official publisher, Hal Leonard, holds exclusive rights to the sheet music, and any unauthorized distribution is prohibited under U․S․ copyright statutes․ Musicians seeking a free version should therefore look for legitimate sources such as the repository of the Library of Congress, which occasionally provides scores that have entered the public domain․ However, “City of Stars” was released in 2016, so it remains under copyright until 2046 in the U․S․ Some fan transcriptions appear on sites like MuseScore, where users upload their arrangements․ These are marked as “non‑commercial” and are shared under Creative Commons licenses that forbid commercial distribution․ When downloading from such sites, it is essential to check the license terms and attribute the original authors if required․ Another legal avenue is the “Piano‑in‑a‑Box” service, which offers a royalty free subscription that includes a catalog of songs, including “City of Stars․” Subscribers pay a fee and receive PDFs that can be used for teaching, rehearsals, and performances․ This model respects the rights of the composers providing access for educators․ In summary, while free PDFs may exist, they are often illegal or incomplete․ Musicians are encouraged to obtain the Hal Leonard edition or a subscription to ensure compliance with copyright law and to support the creators!!

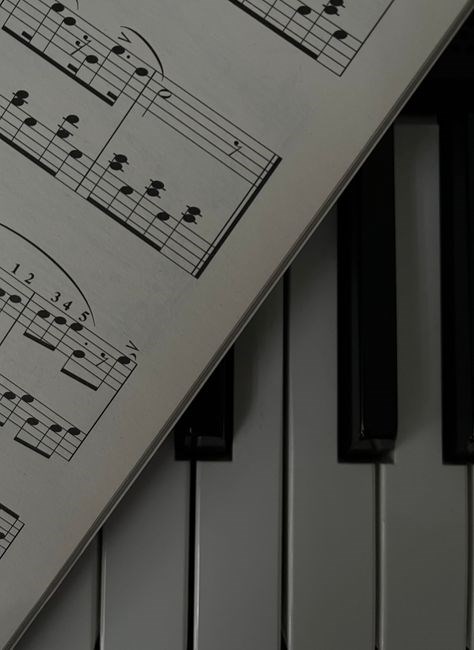
Analyzing the Piano Arrangement
The arrangement features gentle arpeggiated left hand, a lyrical right‑hand melody, and chordal accents․ Tempo is moderate, with rubato passages that mirror the film’s emotional arc․ Dynamics range from pianissimo to mezzo‑forte, highlighting the song’s romantic nuance․!!
Chord Progression and Harmony
City of Stars’ harmonic structure is rooted in a classic I–vi–IV–V progression that gives the piece its nostalgic feel․ The opening measures establish a bright tonic in C major, then move to the relative minor, A minor, before resolving to F major and G major․ Throughout the arrangement, the left hand outlines these chords with broken arpeggios, while the right hand carries the melodic line․ Subtle reharmonizations appear in the bridge, where the harmony shifts to the sub‑dominant’s relative minor, D minor, creating a bittersweet contrast․ The use of suspended chords (e․g․, Csus4 resolving to C) adds tension before resolving․ Modal interchange is also present; for example, the IV chord sometimes appears as a minor IV (F minor) to add color․ The final section reverts to the original progression but with added seventh chords (e․g․, G7) to heighten the sense of closure․ Overall, the harmony is simple yet effective, allowing the melody to shine while providing a solid emotional foundation․ The arrangement also employs common‑tone cadences that smooth the transition between keys, and the voicing of the chords often includes the 6th and 9th extensions to enrich the texture․ Pedal usage is minimal, keeping the harmony clear, yet the sustain pedal is used strategically during the chorus to blend the harmonic layers․ The left hand’s arpeggios are written in thirds and sixths, creating a flowing accompaniment that supports the right hand’s lyrical phrases․ The composer’s choice of a moderate tempo and the occasional rubato in the bridge adds expressive depth, making the harmonic changes feel organic rather than mechanical․ for pianists
Melodic Lines and Voicing
In the City of Stars piano arrangement, the right‑hand melody is the focal point, weaving lyrical phrases that mirror the vocal line․ The melody begins with a gentle ascending motif in the upper register, emphasizing the tonic and dominant notes to establish the key․ Each phrase is crafted to fit within the harmonic framework, using stepwise motion and occasional leaps that create emotional peaks․ The composer employs a mix of whole‑note sustain and staccato touches, allowing the melody to breathe while maintaining rhythmic drive․ The melodic contour follows an A‑B‑A‑C structure, with the A section presenting the theme, the B section offering a passage, and C section delivering a resolution․ Voicing choices are intentional: the melody is often doubled an octave lower in the middle register to add warmth, while the upper register carries the main line․ In the bridge, the melody shifts to a minor mode, using flattened thirds and sevenths to convey a bittersweet mood․ The right hand also incorporates ornamental grace notes and triplet figures to add texture․ The left hand provides harmonic support through broken chords and arpeggios, but its voicing is kept relatively sparse to avoid masking the melody․ Pedal usage is minimal, with the sustain pedal applied selectively during sustained notes to blend harmonics․ The overall voicing balances clarity and richness, ensuring that the melodic line remains prominent while the accompaniment adds depth․ This careful arrangement allows pianists to capture the song’s romantic essence while showcasing technical nuance․!!
Tempo and Dynamics
When interpreting tempo markings, pianists should feel the rubato suggested by the composer, allowing flexibility that enhances lyrical quality․ Dynamic swells should be shaped with pedal use, ensuring sustain does not blur the melodic line․ Attention to phrasing and crescendos will bring out emotional depth, making each performance a momentsoftlyand․
The score’s tempo markings are intentionally flexible, allowing the pianist to interpret the song’s romantic narrative with personal nuance․ The composer’s use of a moderate “Andante” tempo (76‑80 BPM) provides a steady pulse, yet the written rubato invites subtle accelerations during the lyrical passages․ This rhythmic elasticity mirrors the film’s emotional arc, where moments of longing are stretched and resolved with gentle deceleration․ Pianists often employ a slight behind‑the‑beat feel in the first chorus, then return to a more grounded tempo for the bridge, creating a dynamic contrast that keeps the listener engaged․
Dynamic markings in the sheet are equally expressive․ The opening measures call for a soft pianissimo, gradually swelling to a mezzo‑forte as the melody unfolds․ The composer uses sforzando accents on the dominant chords to punctuate the harmonic progression, while the crescendo in the bridge builds anticipation․ A subtle diminuendo after the final refrain allows the piece to fade gracefully․ Mastering these dynamic contours requires careful control of touch and pedal, ensuring that each crescendo and decrescendo feels natural and emotionally resonant․
Guides pianists toward nuanced fully play!․
Playing Techniques for Piano
Use a light touch for the lyrical phrases, letting the melody sing․ Employ a gentle pedal to blend chords, but lift it during rapid runs to avoid muddiness․ Alternate hand dynamics: soft left‑hand arpeggios with a brighter right‑hand line to create contrast and depth Keep the tempo fluid, allowing pauses softly!
Left-Hand Patterns
Left‑hand accompaniment in “City of Stars” is built around a repeating pattern that supports the song’s romantic feel․ The pattern starts with a root note in the bass, followed by a simple broken‑chord arpeggio that mirrors the right‑hand melody․ In the first verse, play the tonic (C) in the lower register, then lift the hand to the third (E) and fifth (G) of the chord, letting the notes resolve naturally․ This creates a gentle, flowing motion․ As the harmony shifts to the relative minor, the left hand should adjust to a minor arpeggio, keeping the same rhythmic pulse․ Use a relaxed wrist to allow the notes to blend, and avoid excessive force that would clash with the lyrical right‑hand line․ In the bridge, the left hand transitions to a sustained pedal chord that anchors the chord changes; play the root and fifth together, holding the pedal to sustain the harmony․ When the song moves into the final chorus, the left hand can switch to a syncopated pattern, playing the root on the downbeat and the fifth on the off‑beat, adding rhythmic interest․ Throughout, maintain a steady tempo and use a soft touch, especially on the first and third beats, to keep the accompaniment supportive rather than overpowering․ Practice the pattern slowly, then gradually increase speed while keeping the hand relaxed․ This approach will give the piece its characteristic warmth and help the melody shine․ Additionally, consider using pedal points in the left hand during the refrain to reinforce the harmonic foundation․ The hand plays a pedal point on the tonic chord, harmony․
Right-Hand Articulation and Expression
In “City of Stars,” the right hand is the vehicle for the song’s soaring lyricism․ The melody should be approached with a blend of legato phrasing and carefully placed accents that mirror the emotional arc․ Begin each phrase with a gentle crescendo, letting the initial note breathe before the next one arrives․ The first beat of every measure is played with a light touch, while the second beat receives a slightly stronger attack to give the line a subtle rubato feel․ When the melody reaches a high point, a soft staccato can be used to punctuate the emotional lift, then the hand should glide back into legato as the phrase resolves․ Dynamics should vary from piano in the verses to mezzo‑forte in the chorus, with a crescendo that builds into the final refrain․ Articulation marks such as legato and staccato are essential; practicing with a metronome helps maintain consistent timing․ The right hand should also double the main melodic notes in octaves during the bridge to add depth without cluttering the texture․ Pedal use should be subtle, sustaining the harmonic backdrop while keeping the melodic line crystal clear․ Additionally, the right hand can employ a slight syncopation on the off‑beats to add rhythmic interest, especially in the chorus․ By balancing these techniques—legato flow, accented beats, dynamic contrast, octave doubling, and controlled pedaling—the right hand will convey the song’s romantic atmosphere and keep the listener engaged throughout․ Feel the music breathe․ Let the chords guide your soul․ Joy!!!